Sentry Models Ruined Building

I painted another fabulous resin building from Sentry Models I bought from Raventhorpe. Its a two storey and a one storey wrecked building. I made my own base from MDF and added heaps of extra rubble to the base to blend them in. The second storey is removable to allow a squad into the ground floor.

I used my normal cheap acrylics to paint over a spray paint undercoat of dark brown. Plenty of dirt and dust added to finish them off plus some flock and tufts.

If you do not want to build your own buildings these really are the best things since sliced bread. I am happy to mix them in with my home made stuff as they really add an extra bit of detail and realism to your table. The last photo has my first ruin and a Jagdpanther creeping around looking dangerous. I have a finished farmhouse from Sentry next up. Check out Raventhorpe on Facebook, there is a massive range. On their Facebook page there are heaps of inspirational photos of amazing looking table setups using these buildings. It’s a closed group but you can sign up.

Esci Pz.Kpfw.IV in 1/72 scale

Esci German Tank pz.kpfw.IV ausf.g 1/72 Scale Model Kit Tank NEW

I picked two more Panzer IVs on eBay just like this one. Costing less than $10 each, such good value, even if they are the kits with the nasty vinyl tracks. I am now confident I can defeat the horrible things with a good dose of super glue and patience. I needed a couple more Panzer IVs to go with my Zvezda troop that I built previously. These Esci kits still hold up nicely, you just need to give them a bit more love than more modern kits. These two I made quite a few alterations to get them up to scratch.

First up is to sort out the tricky tracks. I managed to totally snap one of the tracks trying to wrap and glue them around the running gear, leaving a missing section. My solution for both vehicles was to scratch build side skirts to cover up the top section of the tracks. This gave me free reign to use wire to connect the tracks to the top return rollers, knowing it would all be covered up by the schurtzen. I used thin plastic card and the Zvezda skirts as a template. I also needed to build turret armour using the same plastic card superglued to thicker wire so it would retain its curved shape around the turret. This worked out quite well as I basically just tried to copy the Zvezda tanks.

One of my old Esci kits had a malformed gun barrel, so i bought a nice new metal one for a few dollars and replaced it. This was a great improvement too. I also picked up a tow cable to add. I drilled some holes and glued in aerials as usual. These kits let you leave the turret open so I did that on one tank ready for my AB figures crew man.

Paint job was a black undercoat followed by a Tamiya dark yellow spray. I then hand painted the green camo which was followed by a light overspray of dark yellow again. Gloss varnish and decals is followed by a MIG dark brown wash to pick out details. I did some chipping and scratching to make it all look nice and work, using a sponge and even just sand paper to leave some marks on the paintwork. After a matt varnish i used plenty of dusty pigments for the weathered look. My AB commander was painted and added and you can see him relaxing in his hatch below.

I was happy with the end result with all my additions and they fit in nicely with the two Zvezda kits i had made previously. Overall these Esci kits are great if you can be bothered to give them a little more love and attention.


Zvezda Panzer IV Ausf H in 1/72 Scale

See the source image

Zvezda really do make some great kits in 1/72 scale. I have already made their Panther and also their Tiger. This Panzer IV is better than both of the big cats. I have built Panzer IVs from Esci, Dragon and Armourfast, but these Zvezda kits are better than any of them from all perspectives. The kits go together beautifully, have great detail, plenty of parts to keep you interested, and are decent value for money. This pair I picked up from the Ukraine via eBay at less than $15 AUD each. In my book that’s a bargain for something a lot better than a quick build kit.

After struggling for weeks with horrible tracks, these tracks are great and so easy to put together. The kit comes complete with side and turret skirts, which I chopped up a little, mainly inspired by the excellent box art. My one criticism is the commanders hatch is modelled closed with no option to open it. I added a couple of washing up brush bristle aerials just to finish the whole look off.

Painting was just a bright camo green on dark yellow plus some chipping and plenty of dirt and dust. I also built two Esci old Panzer IVs at the same time which I will post up next. They were a whole different ball game and gave me far more of a challenge to get up to scratch. If you need Panzer IVs for your German army run out and grab some of these!


Esci Marder III in 1/72 Scale

Boxart Marder III 8010 ESCI

OK so I have finally been beaten by vinyl tracks. I am very sad to admit defeat. I have spent most of August working on a troop of Panzer IVs from Zvezda and Esci (vinyl tracks!), but I tried to finish off this old kit I picked up for pennies. Alas no it was not to be……. After many attempts trying to use my superglue and patience technique on this little guy I ended up with too much super glue and too little patience.

The kit was thrown in the garbage, something I am not proud of, but you have to draw a line somewhere. Buyers beware this one is a real dud. I think I better turn to Unimodel and buy their Marders as their kits are excellent.

Should have my panzers finished soon and I can get back to posting something more constructive!


“The Battle For Arnhem 1944-1945” by Anthony Tucker-Jones

The Battle for Arnhem 1944-1945

Another favourite classic war film of mine, and I am sure many others too, is “A Bridge Too Far”. People always mention the historical inaccuracies and problems with the filming and actors’ egos etc but I really enjoy it as a war movie. It is up there with “The Longest Day” with an all star cast and blockbuster sets and great effects for the time.

Behind the Hollywood version there is a truth that is both an amazing and bold military plan, verging on the foolhardy, and a great story of bravery and survival. Unfortunately the plan ultimately failed, but if successful could have shortened the war and stopped further suffering in occupied Europe. This visual history of the Battle Of Arnhem is an excellent summary of all the actions through some text and many pictures. It was more of a series of battles rather than one big one, involving airborne landings to capture bridges and create a pathway to the main objective of the Arnhem bridge. Once objectives were captured an armoured force was to make it’s way as a relief column to clear a pathway all the way to Arnhem. Field Marshal Montgomery underestimated the strength of German forces in the area and their ability to regroup and counterattack resulting in the failure of Operation Market Garden.

As a wargamer of World War Two I have a great interest in all aspects of this operation and I am very keen to recreate parts of the Arnhem battle. An airborne assault on a canal bridge or an armoured column under attack on a long road. There are many great ideas here. The photographs are fantastic and show many scenes of all the engagements and situations throughout the campaign. The writing is very clear and concise and accompanied with some very informative maps. Tracking the action and linking it to the pictures is easy and it makes for an excellent read. If you have any interest in Operation Market Garden and the Battle For Arnhem then this book is for you. Of course now I will need to dust off my copy of “A Bridge Too Far” and watch it again!


“M7 Priest: Rare Photographs from Wartime” by David Doyle

I have been unable to get any models built in the past month as we have been out of the house while getting some renovations done, and then we were overseas for three weeks on a most excellent holiday! So I am missing my hobby a bit and getting itchy fingers.

But luckily I can still read and write. My latest reading material is about another awesome Allied design from World War Two, the M7 Priest. It was a powerful 105mm howitzer placed on a Sherman hull, used for supporting infantry and attacks with some heavy firepower. It was used very effectively during the war and even after in later conflicts. I had just purchased two Priest kits made by Unimodel so it was excellent timing that I had this book for inspiration for when I actually get around to building them. Plastic kits of the Priest in 1/72 scale are very hard to find, and I think Unimodel must be one of the only manufacturers.  The Plastic Soldier Company make a Sexton, and I think Revell do a 1/76 scale Priest, but Unimodel maybe the only 1/72 scale producer.

Anyway the book is full of fantastic pictures, as the main title “Images of war” suggests. It does detail the design and development stages of the Priest, plus some specifications and performance of the vehicle. But most of all there are many, many shots of the tank in action in many different situations. They were used in multiple roles from blasting strong points, longer range artillery and even transporting troops. The main design was constant but details were fiddled with over the years and these slight differences are illustrated very well throughout the many photos.

If you have an interest in this particular vehicle or you are planning to build one in small scale this book is a great source of visual inspiration. I will be picking a couple of pictures out to use to base my kits on when my Priest models get to the front of the queue. I was very happy to add this book to my growing collection of reference material for military vehicles from World War Two. If you like tanks you will enjoy this book.

Escape From Stalag Luft III

One of my favourite movies of all time must be the Great Escape. Watching Steve McQueen try and hurdle the barbed wire on his German motor bike, and losing my mind when Gordon Jackson gets caught out at the train station with the simple words “Good Luck”. It is one of the greatest War movies of all time, capturing the spirit of Allied POWS trying to continue the war effort, and their never say die initiative and ingenuity. Its a classic, although its roots are firmly entrenched in the horror and suffering of war.

When you read Bob Vanderstok’s book about the escape you can see how the movie captures the actual events and personalities involved so well. As a Dutch pilot Vanderstok actually had to first of all escape Holland and make his way to England where as a RAF pilot he was then shot down, captured and sent to Stalag Luft III. So in reality he escaped twice. The book is a riveting read from start to finish. The lengths the prisoners went to, from unsuccessful escapes, to planning and resourcing via any means necessary, are just amazing. The escape was a fantastic achievement and a great climax to the book, although obviously tainted with great sadness as many of the escapees were captured and killed.

If you love the movie you will love the book, so I suggest you buy a copy! If you haven’t watched the classic The Great Escape you need to sort that out too quicksmart!

Esci Pz.Kpfw.V Panther in 1/72 scale

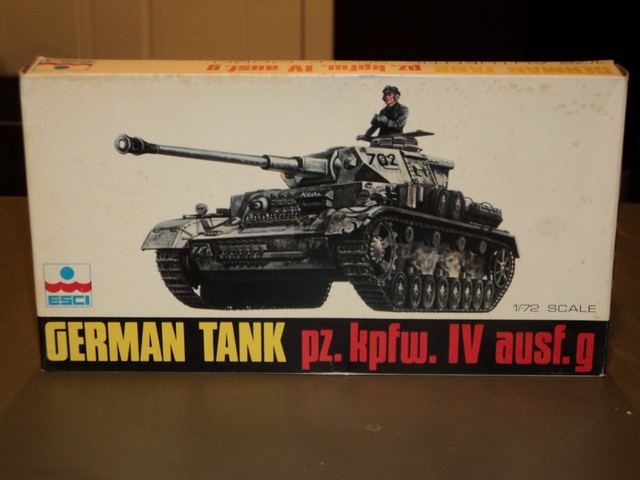
One more Panther! This will be it. I now have seven Panthers which is enough for any battle. Four from PSC, Zvezda, Dragon and now a vintage Esci kit.

I have been having a lot of fun buying up these old Esci kits on eBay. They really hold up well even after all these years. I think I like the smell of old cardboard and instructions with brown edges. This one had an illustration of using a lit cigarette to help melt a bit of sprue for an aerial. Fantastic suggestion back when cigarettes were good for you.

In comparison the other Panthers I have built in this scale, it measures up well. It is a nice chunky model, like the Plastic Soldier Company ones, only with much better detail. I also prefer it to the Dragon Panther which is too refined and looks a bit boring. So it was a winner all round. I did not use the crewman as he was rubbish, and may pop a nice AB figures German officer in the hatch. I was very happy with the end result, but the building of this model kit was definitely a challenge. Two words. Vinyl tracks. I am sort of seeing them as a positive now, like a badge of courage, I have to conquer the shitty vinyl tracks. In this case I managed to snap the front sprockets, but trusty drill and wire to the rescue I fixed them up better than ever. Probably two gallons of super glue were used in the making of this cat.

A very weird design issue with this kit was the lack of hull above the running gear. Esci have left off a whole area where you can just see into the hull of the tank. Very odd. So that needed fixing with some thin plastic card. The tow cables were tricky to fit and needed more super glue and patience. I made an aerial out of washing up brush as usual, rather than taking up smoking again and stretching sprue with my Benson and Hedges.

I gave up modelling when I started smoking in the 1980’s, but then luckily modelling has been the addictive habit I have taken up again in the 2010’s. Gave up smoking a long time ago. Probably a good swap from a health perspective.

I used a red brown base followed by dark sand and three colour camo. I made sure I under cooked the chipping and went easy on the dust and dirt. Learning from previous over cooking. The original decals were brown and crispy like barbequed pork so I used some nice new ones. Happy Easter everyone!

8026


Dragon Sd.Kfz. 171 Panther Ausf.D Late Production

Another big German tank finished. This time a Panther. So far my Panther brigades are made up of Plastic Soldier Company vehicles and one from Zvezda. Dragon kits are always a special treat, they are great to put together. I always keep one eye on the Dragon USA web site as they often have special deals with kits going as cheap as USD 8-10. That is a great saving over anywhere else. It is very rare that Dragon kits come up on eBay for resale, and if they do they are quite often priced higher than buying from the source. So where is the value in that?

The moulding and detail on this kit is of the usual high standard I would expect from Dragon kits. The running gear is very clever as it is moulded in rows making sure each level of wheels is straight. It also saves on time but does not reduce the realism. The tracks are the nice soft type that fit very easily and can be glued to produce sag on the top of the wheels. Oh what a relief after fighting for days with a face full of superglue wrestling with those old Esci tracks! The detail is very delicate and a different level to the Plastic Soldier Company models. The only addition I made was the plastic aerial on the back. The side skirts are optional and are nice and thin. In hindsight I wish I had made some damage to one of them like on the box art. Next time.

My paint job started out well. A nice covering of sandy dunkelb, followed by camo green and red brown patches with my brush. Then I over sprayed with my Tamiya dark yellow to fade everything out. Unfortunately I am still experimenting with my weathering. So I think this time I overdid it with the chipping and lost some of the impact. As always its a learning experience, so next time I will take it easy with my sponge. I used decals supplied with the kit from the two options you get.

This is a great kit. Much better than some of Dragon’s other “fast build” type offerings I have built. I think to hide some of my average painting I will add some extra foliage branches and stuff like that. In case you are wondering I had to take photos on a bit of white paper as my table is all packed away for renovations. I think I need a stronger light source for my photos! Next I have a vintage Esci Panther, oh no back to the horrible tracks of death……….

Esci Jagdtiger in 1/72 scale

Oh boy another big cat I had never built before. This time a Jagdtiger tank destroyer. It’s a beast of a vehicle. Another eBay purchase for not much more than pennies. The kit seemed pretty old as the box was beaten up and the decals died a while back, but the box art still looks pretty good. Opening up the kit I just love the smell of 1980’s childhood I get from fading paper instructions and old cardboard.

I do read a lot of criticism on the net about these old Esci kits, but I love them. This one is another old gem. It’s a relatively straight forward and easy build as the tank has no turret and is made up up a big piece of lower hull and a big piece of upper hull. One massive barrel of a gun. It comes with a commander figure who I declined to include, plus a couple of hatch torsos who were also relegated to the spares box. All the detail is nice and chunky. Towing cable and extra track add some interest to the solid sides of the tank. One of the pictures in the instructions showed some battle damage on one side of the fender, so I hacked off the front fender on the left side.

The only thing that’s a real struggle with these Esci kits are the tracks. They are this horrible stiff vinyl type stuff that doesn’t want to go where you want it to go. Whatever you do, do not attach the side fenders until after you have the tracks finished. I used a lot of super glue and some clamps and wedges, and a lot of patience to get the tracks to glue and stay. I found that gluing and weighting or clamping or wedging them a small section at a time was the only way to do it. I managed to get the tracks to wrap around the front sprocket and then sag only by wedging some card firmly under the upper hull while the super glue was drying. So tracks aside the construction was problem free!

Paint job was a three colour camouflage I pinched from the internet somewhere. Chipping and mud and dust and rust all added later. The decals are from my spares box as the originals were yellow and crispy. Overall a great little old kit that still scrubs up nicely, if you can put up with the tracks from hell……….

My photos are limited to the churchyard right now as everything is packed away ready for some renovations in our house!