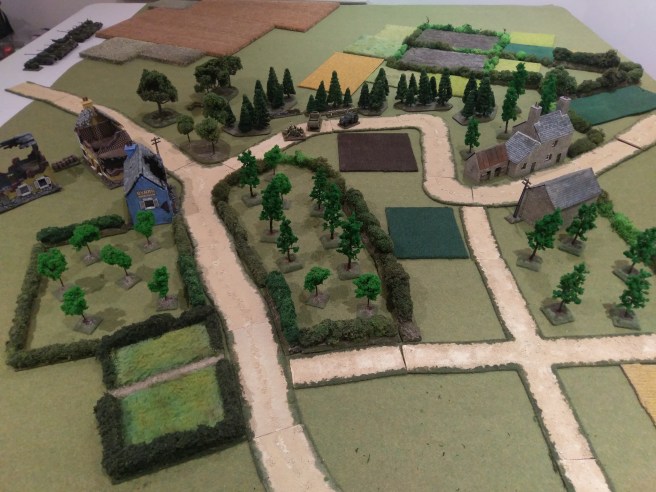
Even though i was not too keen on on Too Fat Lardies I Aint Been Shot Mum, due to the card activation system they have over there, i do like their scenarios. I thought i would give one a go using the Combat HQ rules that i have been playing with. The map was pretty straight forward with two small hamlets behind a wall of trees East – West as per the photo below. The trees across the middle are impassable to vehicles. The ploughed fields, wheat fields and orchards i counted as broken ground. Orchards provide light cover to anyone in them. All hedges were light cover and minor obstacles. The Germans were defending with three platoons of three sections each armed with a panzerfaust. Also an HQ with a Panzershreck, a Pak 40 AT Gun with tow, a Forward Observer commanding a battery of mortars off table, but no armour. They could set up concealed anywhere South of the tree line. The British consisted of a company (3 platoons of 3 sections), two troops of tanks (3 Cromwells, 1 Firefly per troop), a Company HQ of PIAT and Light Mortar, plus a Forward Observer in a Dingo Scout Car. They could enter from the North East corner. The British had to drive out the Germans from all the houses to win. The Germans had to hold at least three buildings to win. Morale failure by either side would also end the game.

First up i like to have all my squads individually based. Rather than using the basing convention of 3 figures to a squad as per the Combat HQ rules i just use individual figures that must remain within 1 inch of each other. It means the squad foot print is larger so your command groups of infantry can cover more area. It does not make any difference to anything else. As each German section contains a panzerfaust it means I can have 1 figure in each section carrying one, then when he has taken his shot I switch him out for a rifleman. This negates the paperwork requirement of tracking who has fired his panzerfaust and who hasn’t. Also I bave many cool panzerfaust firing figures so i want to use them. I also tripled the range of the panzerfaust to 3/6/9 inches (Short/Effective/Long) as the Germans were at such a disadvantage to the British armour. The ranges for panzerfausts and panzershrecks are on the short side and they need to be increased to give them any chance of ambushing tanks. Otherwise they end up being pounded by HE and every attack is a suicide run to get close to their targets. I also use Forward Observers as dedicated units in my version of Combat HQ, and if they are destroyed you get a higher Target Number when requesting support (+1) if not a FOO making the request.
Anyway enough rule chat, onto the action. The Brits attacked with a full platoon, FOO and one troop of tanks down the East side heading for the farmhouse, and another platoon heading for the middle of the trees, and kept the third platoon and second troop off the board.
Here we see British advance on the right flank and the German FOO in the trees. The British got their 25 pdr battery going early onto the tree line and caused a bit of suppression. The Germans suffered badly from terrible command dice rolling and had at least four command failures giving the British 2 or more extra dice. Early on the British armour was able to make a number of double and triple moves, with the speedy Cromwells avoiding the German mortar rounds and getting close to the farmhouse. Only a squad was defending the farm and once their panzerfaust missed its target the Cromwells wiped out the whole squad with MG fire.
Above German Mortar fire getting a bead on advancing armour and doing very little damage. One of many command dice failures by the Germans (black dice). The Cromwells get up close and wipe out the squad in front of the Farm.
 More Germans move to try and defend the farm, still under artillery fire. Already the British grabbing initative with their excellent command dice rolls was having an impact with the Germans having to react with fewer order dice.
In the middle of the trees the British attacked the one German squad that was dug in and managed to close assault with two sections. Close Assault is deadly in Combat HQ. The German squad was annihilated for the cost of one British section. Another German squad made a double move and managed to wipe out the British section in Close Assault, who were in turn wiped out by the remaining British section from that platoon. Suddenly the Germans had lost 3 squads quickly and the British were in the trees.
The tank troop on the East flank continued to maneuver around the farm to the South with a plan to attack the Germans from the rear. The German commander was now realising he should have moved his Pak 40 AT Gun earlier. His only option was to send the panzershreck team to try and intercept the Allied Armour. Throughout the whole of the game German AT weapons were thoroughly useless and on another day they could have won the game. Meanwhile the second British tank troop came charging towards the Western houses, so at least the Pak 40 gunners could warm up some shells and get ready for some action.
The panzershreck team couldnt hit a barn door and get wiped out by the Cromwells, who continue at a fast pace and get behind the AT Gun who is set up at the Western crossroads. The Farm buildings in the East are taken by the full platoon of British infantry. Finally the Germans hiding in the West end of the trees manage to ambush the second troop and blow up one Cromwell. And finally the AT Gun is turned around and hits the approaching Cromwell from the South. However this exposes his backside to the oncoming second troop who quickly blow him to pieces. More misses from panzerfausts in the ruined houses and the game is up for the Germans as their morale drops below zero.
So a good fast game, which the British won very easily due to quite excellent command dice roles always giving them a big advantage in orders. The Germans defended OK but should have had their AT gun in a more useful position, and they also left themselves a bit thin trying to defend the whole front rather than concentrating on one area. If they had scored a few more kills with their AT weapons it may have been a different story.


 More Germans move to try and defend the farm, still under artillery fire. Already the British grabbing initative with their excellent command dice rolls was having an impact with the Germans having to react with fewer order dice.


