Hasegawa Humber Armoured Car 1/72 scale

While i was on the Hasegawa modelling wagon i dragged out these two Humber armoured cars i made a while back, and thought i should add them to my blog. Great value when you buy from Japan or China these guys were no more than USD 10 each delivered to Australia. Better than buying from the UK at close to the same in pounds…..

As usual with Hasegawa models they were easily put together and not too complicated to build. I didn’t like the metal axle rods and lack of suspension. You need to fix the metal rods so the wheels do not slide from side to side or rotate. I should have fixed these two to an MDF base to prevent any slippage and also as they are quite delicate. They come with some stowage items like a box or two and some rolled blankets/tarpaulins. The crew figure, which typical for Hasegawa, is awful. So i replaced him with a crew man from Battlefield Miniatures. I also added aerials so the forward recce team can radio into headquarters when they spot the enemy.

Choices for your British in plastic 1/72 scale Humber Armoured Cars is extremely limited, and in fact i think only RPM make an alternative version. I haven’t seen that model but can recommend these Hasegawa kits as an excellent addition to any British force.

Looking at these pictures i may go back and add some more mud/weathering/dirt to my vehicles as they look a bit clean!

Hasegawa Puma Armoured Car

My German force definitely required this iconic armoured car for the front line reconnaissance units. My choice was either the Hasegawa or Roden version, and opted for the Japanese model company mainly due to getting one for around $10 direct from Japan.

Hasegawa make excellent models for wargaming, not too complicated, but entertaining to put together, and with an excellent amount of detail. I think far better than the quick build stuff out there. This Puma was no exception. One particularly good thing is the way the wheels are set up which makes them really easy to align. With eight wheels there is a lot of capacity for making a mess, but the easy construction of the suspension means it hard to screw it up. The only thing i did struggle with was the main gun assembly which i couldn’t quite work out from the instructions and pictures, resulting in me fudging the connection to the turret a bit. Not that i can tell now.

I popped in an AB figures commander in control up top, added an aerial out the back. The instructions do show an aerial with like an upside umbrella on top. I tried that but it didn’t look right so i scrubbed it. Three colour camo scheme and based on 3mm MDF finished him off, plus a bit of dry brushed dirt. Hey Presto here is Captain Schulz wandering around looking for trouble.

Zvezda German MG Teams in 1/72 scale

Just a very quick post on a couple of German MG teams painted up and based ready for our next clash. Coming in a box of two for a few dollars this is a great little kit and good value. The poses are excellent and look really good hiding behind a grassy knoll. Based on small MDF squares and painted in SS camo these dudes will bolster the firepower of my German troops.

Taking photos of figures with my phone is not the best but i hope you can make them out OK!

20160111_201834 20160111_201732 20160111_202530

River Sections and Rustic Bridge

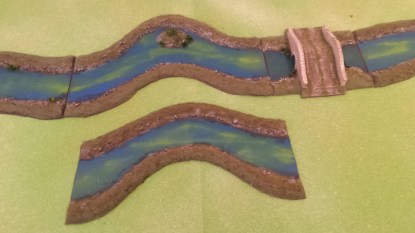
Finished some river sections and a rural bridge this week. The river sections all made with 3mm MDF cut to shape. I then added modelling clay river banks. The banks were then sealed in with a coating of acrylic filler, and then coated with a thick layer of sand and PVA glue. Some bigger gravelly bits were glued close to the waters edge. The water itself is just blue and green spray paints, the photos are actually a bit brighter than real life. The banks were sprayed brown then dry brushed with a lighter shade of brown and then flocked with a  couple of greens. I added some reeds made out of an old cut up paintbrush which came out OK.

My bridge was scratch built using foam board covered with embossed plasticard. Details were added with modelling clay. The road way was just cardboard bent and glued in place. Painting involved various different colours including grey, light brown, sandy yellow and pink.

The river sections were all 15 cm wide and from 30 – 40cm long. I need to make some shorter bits and also some more 45 and 90 degree turns for variety. Photos below!

20160102_100001[1] 20160102_100023[1] 20160102_100058[1]20160102_10023320160102_100140