Charlie Foxtrot Models Houses in 20mm

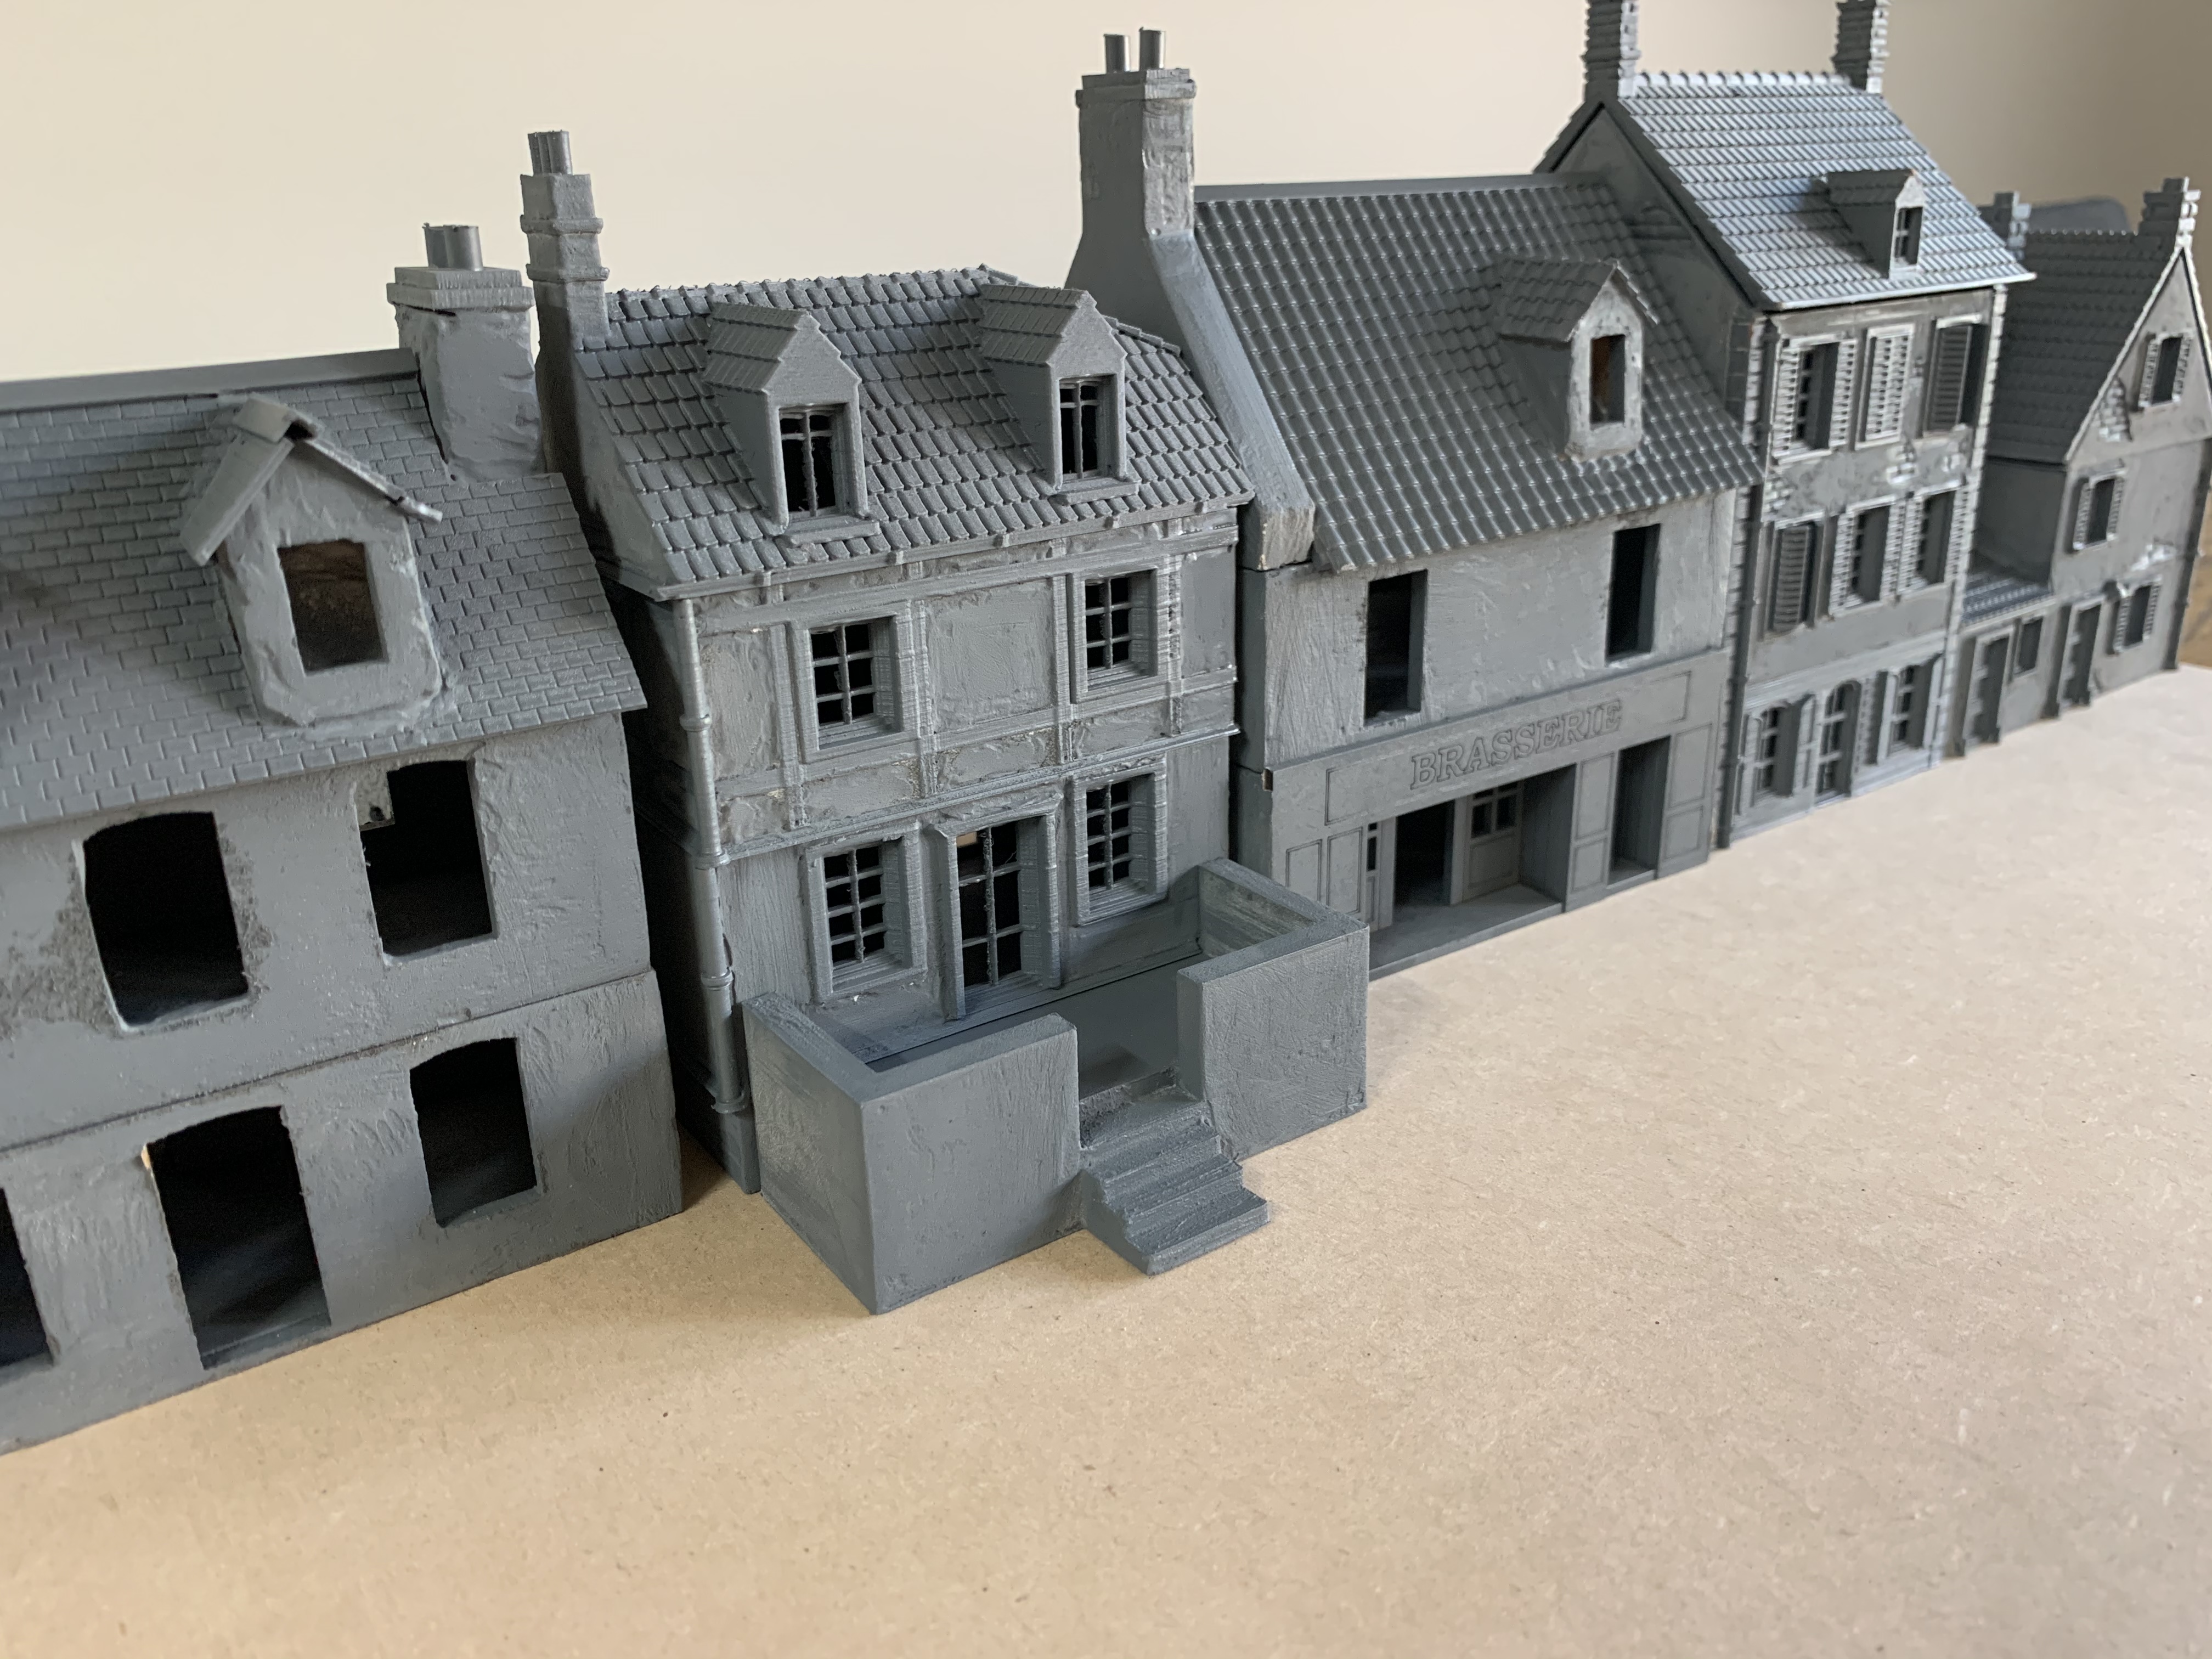
So I have painted up the first three of my new houses, starting with three kits from Charlie Foxtrot Models in England. The Brasserie, Dormer House and Shed. These kits are pretty reasonably priced and come in pieces in plastic bags with a stapled cardboard header and a single sheet of instructions. The main structures are MDF with other bits and pieces being plastic, like chimneys, and balsa wood shutters.

My first impressions were excellent with nice clean bits of MDF which all fits together well. But the instructions are terrible. They could easily write and print much clearer and precise instructions. It must be the smallest outlay of the whole kit, one sheet of paper, but they have not given the modeller much help. So you kind of have to wing it. Luckily most buildings are just a box so you cannot go too wrong.

Armed with PVA glue everything fits together and the kits can be built quickly in an evening. Now as always with MDF kits i have to add and amend plenty of things to get them up to scratch. First up is a layer of plaster over all the outside walls. I did this on the Brasserie and the Dormer House. For the shed i coated in textured plastic sheet to look like stonewalls. You will need to sand the plaster to get it smoother. It covers up all those annoying MDF corners. I also added some tiled roofing, some pantile, some slate, as I really cannot deal with the MDF roof that comes 100% flat. You could also use cut up cardboard for the roof tiles. My last pet hate for MDF kits is the chimney pots. So i added all my own metal chimney pots I had purchased from an excellent model store in the UK.

Once I had made all these additions the buildings came up a treat I think. One last tip for doing gold letters for the Brasserie was to buy a gold paint pen from the newsagent. This made it much easier than trying to paint with gold paint which does not cover very well.

Even with all the additional work I think these Charlie Foxtrot kits are very good and measure up with other MDF producers like Sarissa. If you need buildings quickly and not too pricey check out Charlie Foxtrot


“Setting The Scene Volume 2” by Pat Smith

I was lucky enough to discover Pat Smith’s amazing wargaming blog a few years ago and also grab a copy of “Setting The Scene Volume 1” a while back. Pat’s work is just outstanding and inspirational for anyone with an interest in small scale modelling.

Volume 2 is jam packed with techniques and invaluable skills for the terrain making modeller. Accompanied by buckets of excellent photos Pat runs you through all sorts of building projects from large rocky hills, orchards, terrain mats, to roads, buildings and bridges. Even though the style of terrain is based around the Mediterranean region, it is totally applicable to anyone making terrain for wargames or railways or any small scale project in any geographical region or historical era. It is so much more rewarding to make your own terrain rather than buying it. A whole lot less expensive too!

The photographs are great and accompanied by easy to read text that make the jobs look simple to do, but give you amazing looking results. This is the kind of book that makes me want to run to the hardware store and craft store and then spend a week making new terrain! If you can still find a copy I would recommend getting one!

Sentry Models Ruined Terrace

My last building from Raventhorpe all done. Another awesome sculpt from Tony Raven. This one is a big piece, half intact and half demolished. The remaining roof and first floor is all removable for easy access of troops. I glued it onto a large MDF base and gave it the same treatment as the other ruins with plenty of smashed up bricks and MDF mini bricks. Painted with acrylics and then liberally weathered with all sorts of powders and charcoal dust. I added some flock and tiny leaves for the foliage and grass round the back.

Next time I am in the UK i will be filling my suitcase with a few more of these awesome models. Need a spare bag for 10kg of resin from Sentry Models!!! The last picture has all three of the buildings I bought together. I am excited to get them on a table and have some excellent house to house combat.

Sentry Models Ruined Building

I painted another fabulous resin building from Sentry Models I bought from Raventhorpe. Its a two storey and a one storey wrecked building. I made my own base from MDF and added heaps of extra rubble to the base to blend them in. The second storey is removable to allow a squad into the ground floor.

I used my normal cheap acrylics to paint over a spray paint undercoat of dark brown. Plenty of dirt and dust added to finish them off plus some flock and tufts.

If you do not want to build your own buildings these really are the best things since sliced bread. I am happy to mix them in with my home made stuff as they really add an extra bit of detail and realism to your table. The last photo has my first ruin and a Jagdpanther creeping around looking dangerous. I have a finished farmhouse from Sentry next up. Check out Raventhorpe on Facebook, there is a massive range. On their Facebook page there are heaps of inspirational photos of amazing looking table setups using these buildings. It’s a closed group but you can sign up.

Sentry Models Ruined House

So after quite a long time searching for Sentry Models fantastic buildings I stumbled upon them on a Facebook page. Very excited I ordered a few from Tony Raven who makes these great resin models. Not cheap to get them all the way to Australia, but to be honest they are so good, I really didn’t care about the postage. I picked up a ruined house, a big ruined terrace and another two storey ruin. Sculpting is just beautiful and the detail much better than anything I have managed to scratch build.

My first effort is the single ruin. I glued to an MDF base and then added a heap more of my own rubble to blend it in. This included some bought bricks and some home made rubble carefully crafted from smashing up house bricks with a ten pound hammer. A good coating of PVA glue and then a black and grey primer spray coat on top.

Painting was done using cheap acrylics and a couple of washes and highlights. I did also use some weathering pigments to blend things into the base. Oh and some charcoal for the charred bits here and there. Last touch was the flocking and a few tufty bits. I was very happy with how it turned out and cannot wait to get cracking on the others. I would recommend getting onto Facebook and finding Sentry/Ravensthorpe miniatures ASAP and picking up some of these for your table top.

I still haven’t managed to play a game in 2019, I guess I am just more of a modelling and painting nut than anything else……….

“Wargames Terrain and Buildings – The Napoleonic Wars” by Tony Harwood

Spending my time reading more while the model kits and paints remain locked away in our soon to be finished renovated home. Frustrating but lucky I have a decent supply of interesting books to fuel my hobby urges.

This one is all about scratch building terrain for your wargames table. Making terrain is one of my favourite parts of the hobby and I am always keen to read about how other people do it. What techniques they use, how they decide on what to build, and what materials they turn to. It is a very satisfying feeling to produce your own terrain and really not as difficult as some people may think. Using household items and readily available products you can achieve some really good results with some patience. Of course everything always boils down to how much time do you have? Buying houses is a much quicker option, but home made results I think are usually better.

Tony Harwood, in his book, goes through five or six of his terrain projects in detail and shows us clearly how he achieved his excellent results. This book is aimed at the Napoleonic period, but do not be put off if you are interested in World War Two (me) or the ancient world or anything else. It has relevance to anyone who wants to learn more about building terrain in any period in any scale. Tony starts with a sketch of the piece he wants to build, usually inspired by a photo or something he has seen in a book. Then a framework of cardboard, foam board or foam is built up to create the basic shapes. For extra strength he covers structures in paper and PVA glue. One thing he does not seem to do is leave window openings or removable roofs. Both for realism and playability I do like to leave windows as proper openings into the building and have removable roofs if possible to allow troops to be placed inside.

The go to material for Tony is DAS clay which he uses liberally in every project. This fast drying clay is brilliant for creating terrain as it can be moulded into anything and can be cut and carved. Once you have covered your structure in clay you can carve texture like bricks or stonework into it and make some very realistic effects. What I liked about Tony’s projects is he is happy to change his idea during the process and add and subtract bits and pieces to improve his design. Roofing is dealt with either store bought pantiles or cardboard roof tiles, both inexpensive or free solutions. There is an abundant use of bits of foam, balsa wood, plasticard, paper, card and even skewers. All stuff you can get hold of very easily.

I really enjoyed this book. Its a nice quick read with very clear and concise instructions. Tony’s techniques can be applied to any terrain structure you can come up with in any period you are keen on, so do not be put off if Napoleon is not your cup of tea. I love making terrain and this just adds fuel to my itchy fingers!


Battle Of Lingevres Rapid Fire Rules

Finally after months of building and painting, and getting distracted by any number of other things, I have managed to get some terrain onto my table ready for a game. I am going to give the Rapid Fire rule set a run and see how it stacks up with all the other rules I have tried. Ultimately I am going to write my own rules with all the good bits from all the rules plus some bits from Squad Leader too. Still a work in progress but one day I will get there!

I picked the first sample battle Lingevres from the Rapid Fire Rule book. I finally finished my big church a couple of months back so that was the main bit of terrain I was missing to fight this little engagement. I expanded the map a little bit to include a ruined side of town. I wanted to try out some of the big piles of rubble I had recently made. I had bought some pre made red bricks from Green Stuff on line, which although were listed as 28mm, work fine. I also read a very simple rubble making tip of hitting a red brick with a hammer until you have the correct size scale bits. Plus i had made some grey and black and white rubbly bits out of modelling clay. Mix all these sources together and i ended up with a big bag of rubble. I was very happy how it came out spread around all my ruins and over my ruined car pieces. Certainly adds some atmosphere to the ruined side of town.

Check it out! I have to finish thirty British infantry and some PIATS this week and then we can get the party started!

Rough stone walls and wheat fields

I am on a bit of a terrain kick. I had some very cheap doormats from IKEA, which set me back a whopping $10 per mat. I had just cut them up and spread them around, but the colour still annoyed me. They were still too doormat coloured. So they looked like cut up doormats. I bought some different spray cans from Bunnings, one Golden Yellow and one Sandbark, plus I had some Almond left over. Then experimenting with all three got a wheaty shade that I liked. You really have no excuse to create your own inexpensive wheat fields using cheap doormats. Personally I would rather stick a fork in my eye than go to IKEA, but they do have some good sources of modelling materials.

I also made some new rough rural stone walls to line my country lanes. Super cheap source of small stones from Bunnings at around $4-5 per bag. One bag and its enough rocks for hundreds of metres of wall. I just PVA glued rocks in line on top of each other onto MDF bases. It requires a bit of patience as you need to go away and leave the layers of rocks to dry before adding a new layer. A black spray and then increasingly lighter dry brushing with grey and brown is all you need. I flocked the edges with some grassy green and hey presto. Another very cheap addition to your table. Quick and easy and no need to go spending dollars on rough stones walls. They should be rough and rural!

Village Cobbled Streets

I made some new cobbled streets for my Normandy village. Using MDF as the base cut into 8cm x approx. 30cm pieces, I coated each one with a layer of modelling clay. Getting this as flat as possible was a mission, I think a regular rolling pin is the best idea. Then I used an excellent new purchase from Green Stuff World

This is a heavy plastic rolling pin with a cobbled texture on the outside. So all you do is roll it firmly along the modelling clay surface and it leaves a cool imprint of a cobbled street. It was so quick and easy compared to my previous method of individually carving cobblestones with my engraving tool. The pattern comes out very nicely as you can see from the detail in my photos. These rolling pins are not expensive, and I also picked up one for brickwork, which I will use on my next houses.

I wanted to add some bomb damage craters too, mainly to cover up areas where the cobbles were not so great. Circles of modelling clay glued on did the job here. Then I would dig out the hole in the road and cover it all with some fine sand and dirt. Undercoat and plenty of grey paint, plus some drybrush highlights and lots of dirty weathering powders finished it all off!

Check out the Puma armoured car cautiously picking his way through the destruction.