“Wargames Terrain and Buildings – The Napoleonic Wars” by Tony Harwood

Spending my time reading more while the model kits and paints remain locked away in our soon to be finished renovated home. Frustrating but lucky I have a decent supply of interesting books to fuel my hobby urges.

This one is all about scratch building terrain for your wargames table. Making terrain is one of my favourite parts of the hobby and I am always keen to read about how other people do it. What techniques they use, how they decide on what to build, and what materials they turn to. It is a very satisfying feeling to produce your own terrain and really not as difficult as some people may think. Using household items and readily available products you can achieve some really good results with some patience. Of course everything always boils down to how much time do you have? Buying houses is a much quicker option, but home made results I think are usually better.

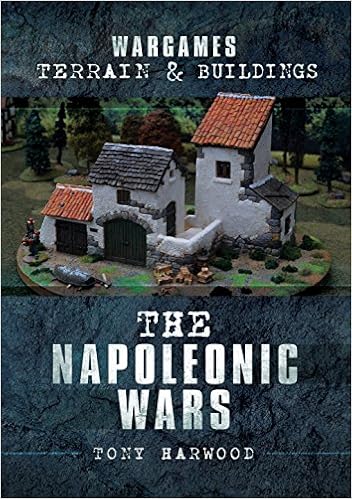
Tony Harwood, in his book, goes through five or six of his terrain projects in detail and shows us clearly how he achieved his excellent results. This book is aimed at the Napoleonic period, but do not be put off if you are interested in World War Two (me) or the ancient world or anything else. It has relevance to anyone who wants to learn more about building terrain in any period in any scale. Tony starts with a sketch of the piece he wants to build, usually inspired by a photo or something he has seen in a book. Then a framework of cardboard, foam board or foam is built up to create the basic shapes. For extra strength he covers structures in paper and PVA glue. One thing he does not seem to do is leave window openings or removable roofs. Both for realism and playability I do like to leave windows as proper openings into the building and have removable roofs if possible to allow troops to be placed inside.

The go to material for Tony is DAS clay which he uses liberally in every project. This fast drying clay is brilliant for creating terrain as it can be moulded into anything and can be cut and carved. Once you have covered your structure in clay you can carve texture like bricks or stonework into it and make some very realistic effects. What I liked about Tony’s projects is he is happy to change his idea during the process and add and subtract bits and pieces to improve his design. Roofing is dealt with either store bought pantiles or cardboard roof tiles, both inexpensive or free solutions. There is an abundant use of bits of foam, balsa wood, plasticard, paper, card and even skewers. All stuff you can get hold of very easily.

I really enjoyed this book. Its a nice quick read with very clear and concise instructions. Tony’s techniques can be applied to any terrain structure you can come up with in any period you are keen on, so do not be put off if Napoleon is not your cup of tea. I love making terrain and this just adds fuel to my itchy fingers!


Dragon Sd.Kfz. 171 Panther Ausf.D Late Production

Another big German tank finished. This time a Panther. So far my Panther brigades are made up of Plastic Soldier Company vehicles and one from Zvezda. Dragon kits are always a special treat, they are great to put together. I always keep one eye on the Dragon USA web site as they often have special deals with kits going as cheap as USD 8-10. That is a great saving over anywhere else. It is very rare that Dragon kits come up on eBay for resale, and if they do they are quite often priced higher than buying from the source. So where is the value in that?

The moulding and detail on this kit is of the usual high standard I would expect from Dragon kits. The running gear is very clever as it is moulded in rows making sure each level of wheels is straight. It also saves on time but does not reduce the realism. The tracks are the nice soft type that fit very easily and can be glued to produce sag on the top of the wheels. Oh what a relief after fighting for days with a face full of superglue wrestling with those old Esci tracks! The detail is very delicate and a different level to the Plastic Soldier Company models. The only addition I made was the plastic aerial on the back. The side skirts are optional and are nice and thin. In hindsight I wish I had made some damage to one of them like on the box art. Next time.

My paint job started out well. A nice covering of sandy dunkelb, followed by camo green and red brown patches with my brush. Then I over sprayed with my Tamiya dark yellow to fade everything out. Unfortunately I am still experimenting with my weathering. So I think this time I overdid it with the chipping and lost some of the impact. As always its a learning experience, so next time I will take it easy with my sponge. I used decals supplied with the kit from the two options you get.

This is a great kit. Much better than some of Dragon’s other “fast build” type offerings I have built. I think to hide some of my average painting I will add some extra foliage branches and stuff like that. In case you are wondering I had to take photos on a bit of white paper as my table is all packed away for renovations. I think I need a stronger light source for my photos! Next I have a vintage Esci Panther, oh no back to the horrible tracks of death……….

Esci Jagdtiger in 1/72 scale

Oh boy another big cat I had never built before. This time a Jagdtiger tank destroyer. It’s a beast of a vehicle. Another eBay purchase for not much more than pennies. The kit seemed pretty old as the box was beaten up and the decals died a while back, but the box art still looks pretty good. Opening up the kit I just love the smell of 1980’s childhood I get from fading paper instructions and old cardboard.

I do read a lot of criticism on the net about these old Esci kits, but I love them. This one is another old gem. It’s a relatively straight forward and easy build as the tank has no turret and is made up up a big piece of lower hull and a big piece of upper hull. One massive barrel of a gun. It comes with a commander figure who I declined to include, plus a couple of hatch torsos who were also relegated to the spares box. All the detail is nice and chunky. Towing cable and extra track add some interest to the solid sides of the tank. One of the pictures in the instructions showed some battle damage on one side of the fender, so I hacked off the front fender on the left side.

The only thing that’s a real struggle with these Esci kits are the tracks. They are this horrible stiff vinyl type stuff that doesn’t want to go where you want it to go. Whatever you do, do not attach the side fenders until after you have the tracks finished. I used a lot of super glue and some clamps and wedges, and a lot of patience to get the tracks to glue and stay. I found that gluing and weighting or clamping or wedging them a small section at a time was the only way to do it. I managed to get the tracks to wrap around the front sprocket and then sag only by wedging some card firmly under the upper hull while the super glue was drying. So tracks aside the construction was problem free!

Paint job was a three colour camouflage I pinched from the internet somewhere. Chipping and mud and dust and rust all added later. The decals are from my spares box as the originals were yellow and crispy. Overall a great little old kit that still scrubs up nicely, if you can put up with the tracks from hell……….

My photos are limited to the churchyard right now as everything is packed away ready for some renovations in our house!

AB Figures British Infantry PIAT Teams

I am continuing to finish my British Company, it’s taking a while, but I am slowly getting there. I have another two squads half finished and another one primed. Also a bunch of commanders, HMGs and observers. My painting speed is so slow I may be done by Christmas. These guys are the anti tank PIAT teams from AB Figures. They are attached at platoon level so I needed three of them. They only come in one pose from AB so I have done three teams the same. They will rarely appear together so I was not too concerned. Maybe I will boost their numbers with an alternative supplier to have more options of figures. As always I love AB figures and they are great fun to paint up. MDF bases and a few tufties and we are ready to stalk some panzers……..

On another note we are having renovations done soon so my blogging time may be severely limited. It will slow down my painting even more……….erghhhhhh

Hasegawa M3 Stuart Light Tank

Boxart M3 Stuart Mk.I 31103 Hasegawa


Another great little kit from Hasegawa in Japan. They are pretty old kits I think but Hasegawa models are always really fun to put together. I have yet to find one that I did not enjoy. I have two later Stuarts from S-Model almost finished to make up a trio of light tanks. So even though I think this older model was mainly used by US forces I have added him into by British just because I felt like it and found him on eBay for a bargain price from someone.

The kit comes in the usual grey softish plastic and is a nice easy build. Usual average rubber type tracks, once they are painted and based they are decent enough. I switched out the awful crew man for an excellent AB figure. You can model hatches open so that’s a good thing. I also added an aerial I think in the right spot, well it looks like a base for an antenna. The turret MG I changed for a much better one from a Trumpeter kit spare, and I added some Cullen hedgerow cutters onto the front as they fitted so nicely. I am not sure cutters were ever placed on the front of these tanks but it looks to me as if they should have been.

A nice olive drab paint job, British decals and some dirt and dust finishes him off ready for a patrol in the bocage. Although armed with a pop gun and paper thin armour not sure what use he is going to be if things get hot……..

Humbrol HK 72205 3/4 TON TRUCK in 1/72 scale

HUMBROL HK 72205 3/4 TON TRUCK KIT CONTENTS SEALED

This was another eBay find. Its actually just an old Esci kit that was reboxed as Humbrol. It’s a kit I first built in the early 1980’s as a young lad. I would have twisted most of the parts off the sprue and glued it all together and got him into the action without a drop of paint. How I was easily pleased in the 1980’s, which is probably why I liked the music back then too…….  It’s amazing how a smell can teleport you back in time, and the smell of this kit gave me such vivid recall. It must be something about the cardboard box and maybe the plastic, anyway call me weird, but it took me back in time.

I remember this truck being my favourite vehicle for my Allied forces. Originally I built him with the canvas tilt on. This time I left the back open, mainly so I can fit in some passengers or cargo sometime. The kit really stands the test of time and puts together very easily. Something about trucks that I really enjoy building. I tried to put some cable using wire around the front winch, but could not quite manage it. I did add some clear plastic as a windshield as that is not included in the model. The original decals had long since perished so I added some of my own. I like the Allied star on the bonnet,  which I think came from a Unimodel kit.

A man from my reliable supply of AB Figures British drivers is at the wheel, I cant remember if the kit came with a crew man. If it did it was probably rubbish so I threw him in the spares box. I love this kit. I think it’s the only Dodge truck available in this scale in plastic, so you better go and find one on eBay.

I seem to find eBay a great source of old Esci kits if you are looking around! I have a bunch at home now gathering dust that I need to get cracking on.


Stonewall Figures Combat Miniatures WW2 British Infantry 20mm

Continuing on with painting up my British Infantry company for battles in Normandy here are a group of eighteen figures I recently finished. They were part of an amazing eBay purchase I made from a lady in the UK which had included a bunch of AB figures plus some unidentified British soldiers. After hunting around on the net for a while I figured out that they were from Stonewall Figures Combat Miniatures range in 20mm.

Stonewall Figures – British

They are much chunkier than AB and CP models and have a little less detail. While the detail is not as refined they are still really nice figures. The faces are full of personality and the poses are all really natural. The detail is very clear which makes these guys very easy to paint, and I had a blast painting this group. There are some really different poses, including squaddies carrying stuff, one with a benson and hedges stuffed in his gob, and another bloke waving his hands around shouting “Cor blimey guvnor!” I have plenty of rifles plus some SMGs and officers.

They mix in very well with all my other metal figures from AB, CP and SHQ. I think in the remaining eBay stash i have some heavy weapons and even a stretcher bearing group. Also a while stack of German Panzergrenadiers who are in the painting queue with a million others. Anyway if you need some extra squaddies to bulk up your forces I would definitely check them out. Here they are in one big group and then smaller bunch of 4 -5 men.

CP Models British Tank Crew

Just another quick blog while I am on a major mission of painting up my remaining pile of British figures. Another favourite figure maker of mine in the UK is CP Models. They do an awesome range of World War Two in 20mm – check them out at CP Models

This little trio of figures will be required when any of my British tank crews bail out and need to fight on foot. An officer with a revolver and the gunner and driver clutching SMGs make up the trio. Blurry photos sorry but my phone camera is useless and needs to be upgraded for taking tiny pictures.

CP Models really give AB Figures a run for their money. I have a whole stack of German panzergrenadiers all primed and ready to go. It’s only my laziness in front of painting endless German camo schemes that is holding me back. CP figures are really nice to paint as their detail is so clear and defined, it makes it easy. Great faces and great poses, you really cannot fault them.

These guys have just jumped out of their Sherman tank. I cant see any damage maybe its just run out of gas and ammo……….

AB Figures British Infantry on patrol

Happy Christmas everyone from down here in sunny Australia. A Boxing Day post while watching the cricket, who could wish for a better day! I am feverishly trying to finish off my company of British infantry so I can replace all my plastic figures, which I am not so keen on, with far better metal ones.

Here are another ten British infantry from my favourite AB Figures. I actually picked these up in an eBay bundle of all sorts of metal figures. It turned out to be a total treasure trove of figures from a lady in the UK who labelled them Anthony Barton figures and I think the naming bypassed all the other modellers like me who would have jumped all over them. The cache also included some Stonewall Figures which i had never heard of, and will be detailed in my next blog or so.

These AB Figures are a squad of ten, including one sterling MG and one Bren gunner, who will be my CO and NCO respectively. They are all in marching, patrolling stances with guns slung over shoulders or carried. As usual with AB the poses are natural and look great, plus the sculpting and detail is second to none. These guys really do paint themselves. The faces are so good that one wash of a red brown over base flesh pretty much looks good enough. Unfortunately my phone camera and photo skills really do not do them justice. Although the faded background does make the photos look like a hazy sunrise patrol. Taking photos of small soldiers really does require extra light and a good camera. Neither of which I have.

I tend to repeat myself a bit, but AB Figures really are the top shelf of wargaming figures, if you did not get any for Christmas, make sure you go out and grab some for a New Year’s present to yourself! Check them out at AB Figures

Battle Of Lingevres Rapid Fire Rules

Finally after months of building and painting, and getting distracted by any number of other things, I have managed to get some terrain onto my table ready for a game. I am going to give the Rapid Fire rule set a run and see how it stacks up with all the other rules I have tried. Ultimately I am going to write my own rules with all the good bits from all the rules plus some bits from Squad Leader too. Still a work in progress but one day I will get there!

I picked the first sample battle Lingevres from the Rapid Fire Rule book. I finally finished my big church a couple of months back so that was the main bit of terrain I was missing to fight this little engagement. I expanded the map a little bit to include a ruined side of town. I wanted to try out some of the big piles of rubble I had recently made. I had bought some pre made red bricks from Green Stuff on line, which although were listed as 28mm, work fine. I also read a very simple rubble making tip of hitting a red brick with a hammer until you have the correct size scale bits. Plus i had made some grey and black and white rubbly bits out of modelling clay. Mix all these sources together and i ended up with a big bag of rubble. I was very happy how it came out spread around all my ruins and over my ruined car pieces. Certainly adds some atmosphere to the ruined side of town.

Check it out! I have to finish thirty British infantry and some PIATS this week and then we can get the party started!