Charles Grant’s “Battle – Practical Wargaming”

While Gavin Lyall’s “Operation Warboard” was my number one, go to rule book, back in the eighties, “Battle – Practical Wargaming”, by Charles Grant, was my silver medal, or my second most read volume. Actually both books were my big brothers, and i just used to borrow them and read them over and over again. I decided to reenact one of Charles Grant’s scenarios from the book. Its a very simple joust between some Panzer IVs and some T34s. I changed it a bit and had a couple of troops of Panthers and Panzer IVs take on a troop of Shermans and a troop of Cromwells.

I based my terrain on the map in the book which you can see below. It gave me a chance to try out my new folding tables i picked up on Gumtree. I also repainted all my river sections with a paint thickening medium to create a wavy texture, then gave them a coat of greeny brown acrylic paint, plus a top coat of gloss varnish. I was really happy with how the end result came out, far more realistic than my previous bright green and blue artificial looking waterways.

Funnily enough my big brother is lining up as the opposition in this little fight. Only 30 years on since i borrowed his book in the first place……… Will post some action shots when battle commences.

Armourfast Panzer IV

Armourfast make a big range of awesome kits for the wargamer. They come two tanks in the box for not much more than five dollars per tank. You really cannot get any better value than that anywhere in the 1/72 scale world of plastic models. I bought these Panzer IV’s to join my Italeri Panzer IV and make up a three tank troop. I have also previously blogged about the Armourfast Cromwell tanks, i think my first post back in October.

You know what you will get with Armourfast, two sprues (one per tank), and minimal parts. These panzers can be put together in minutes with their one piece track and running gear, two part hull and maybe four or five piece gun and turret. If you are looking for super detailed, accurate models, then these are not for you. But if you want good looking tanks, affordable, quick to build and ready to roll onto the table, then these are a great product.

Best thing is you can dress them up a bit and add some bells and whistles. Adding some stowage items, a commander in the open hatch, and some decals really makes up for the basic detail of the kits. I added my own stowage from SHQ and Value Gear, commanders from AB figures and Battlefield miniatures, plus decals from my growing bag of spares. I tried out a different camo scheme, which is more of a blotchy three colour as opposed to my usual stripey ideas. Aerials also added from stretched sprue glued into the thoughtfully provided holes.

Overall another great offering from Armourfast and makes me want to run out and try more of their kits. Photos below as my brace of tanks enters the edge of town looking for a scrap……

IMAG0064 IMAG0063 IMAG0065 IMAG0066 IMAG0067 IMAG0069 IMAG0070 IMAG0068

SHQ Miniatures 17 pdr Gun with AB Crew

After hunting around for a plastic model of a British 17 pounder anti tank gun, i soon realised that the choices i had were severely limited. In fact, i could not find one option for a 1/72 scale 17 pdr gun in plastic anywhere. So in my quest i had to turn to metal manufacturers, which was against my self imposed rules, but i had little choice. On reflection i am happy to break my rules on metal for figures, so why not for anything else?

SHQ make a huge range of everything 20mm for World War 2 and i picked up there 17 pdr for eight pounds fifty. I think after Brexit i may be purchasing more stuff from England in the future if the pound keeps depreciating. The gun is nicely detailed, well moulded and easy to put together with a bit of superglue. I think the model came in about ten parts maximum, so it didn’t take long to build. My crew figures are from AB Figures which is no surprise as they are far and away the best figures you can find.

I cut the base and placed the gun and crew on there first to get an idea of positioning. Then used modelling clay to build it up a bit before gluing the crew on, leaving the gun off. I find this makes it easy to paint the base and the crew before gluing the gun onto the base last. The gun was base coated black before a spray with olive drab. You get some ammo boxes and spare shells with the AB crew so i spread them around the base too.

The 17 pdr is an essential addition to my under gunned British company, especially when they come up against the bigger German tanks. Here he is taking up a defensive position in a French village.

Laser Cut MDF Buildings by In The Greenwood

I had been scratch building all my own Normandy village constructions, but felt i needed to try out something professionally made to balance things out. Oh and i have also got kind of tired of foam board, balsa and modelling clay. On my internet travels i stumbled across the In The Greenwood Ebay shop and then their own web site at http://www.inthegreenwoodlaser.co.uk

They do a range of laser cut MDF buildings in HO scale which are excellent value compared to other companies i had a look at. At around $20 Australian per house i thought this was a pretty good deal, so i ordered three of them. Although I think they are aimed more at Railway people, and are not actually French but rather Victorian, i reckoned i could make them fit into my Normandy landscape without too much problem!

As with other HO Scale manufacturers i have investigated i was worried these buildings would come in too small compared to my own creations and also my range of 1/72 scale models and figures. What a happy chappy i was when they came in around 120mm tall including my extra MDF base and fit perfectly with everything else i had made. The kit comes Ikea style in a flat pack box, amazingly packed in. So i got to work building my first one which was the Victorian Pub. I decided to make it as a restaurant instead.

All the pieces are very cleanly cut and i only had trouble with the bay windows at the front, as the holes in the bottom section did not match up with the holes in the top, so i had to do some carving to get it all to fit together. The instructions follow a step by step process which are a little hard to follow as there are no diagrams, but as long as you are not Stevie Wonder wearing boxing gloves you should be OK. The whole kit goes together with a bit of PVA glue. I added an MDF base to keep it all together, and to create a garden area at the back. One great thing is that the roof can be left removable which is perfect for all you wargamers! I did add some supports inside the roof to give it some extra strength.

My Brasserie painted up nicely and i added a sign on the front and a Martini ad on the side wall, both ideas i borrowed from other designs i have seen out there on the internet. Overall these are great little kits and fit nicely into my village, i am looking forward to making the other two kits i purchased. Check out my village photos below and you can see the MDF constructions fitting nicely into my assortment of home made houses

Ruined Buildings Part 3

So finally after all that construction it’s on to the paint job! Everything was painted a black acrylic as a base coat or primer. That gives the whole thing a good starting point and makes sure all the shadows are emphasized. I painted the undamaged rendered walls first, one a sand colour and one a pale blue. The insides were all painted a dark grey as more than likely they would have burnt in the fires/explosions that must have occurred. Previously i have used wrapping paper with a very small pattern on it as wallpaper. You could easily find a pattern on line and then print it out to a small scale to use as wallpaper for some of the internal walls.

The rubble and debris was also painted dark grey and then dry brushed with lighter shades to a very light grey. The exposed brick was painted a mix of bright red and a terracotta red. I also painted random bits of debris with the same red as many bricks would have fallen around the house. To illustrate the mortar i used a fine brush and a light grey to draw thin lines in between the detail on the exposed brick. The bits of wood on the floor, the roof beams and the internal floors were all painted a dark brown. I left plenty of black on the roof beams to suggest the charred nature of the remains. All the window lintels and shutters were painted white, and needed a couple of coats to get them right. I just used a black biro to draw on the shutters, much easier than a paint brush.

The roof tiles were painted grey and then randomly painted with lighter greys to mix them up a bit. I left plenty of black areas near to blast holes. Finally i lightly brushed black around all the damaged bits to show the extra effects of smoke. To add that extra bit of detail i found some cool French signs on the internet, printed them out and stuck them on the buildings with a lot of PVA glue so they look painted on. A bit of green flock on the base and hey presto the finished ruins.

See my photos below including some British units just nosing around in the smoky ruins! Over and out Colonel Mustard.


Ruined Buildings Part 2

I have continued working on my ruined buildings, and have decided to split the process into three blogs as otherwise it would be a bit heavy on the pictures. However, I did want to detail each part of the construction, so here goes!

To create the piles of debris inside and outside the ruins i first glued lumps of modelling clay at positions on the base next to the walls. I did this both on the interior and exterior in a random way, still leaving decent areas of the interior floor bare. I then covered these raised areas in PVA glue and sprinkled a decent amount of dirt/gravel from my front pathway on top. The stuff out the front of our house is perfect for producing random debris. You can see the construction taking shape below.

Next up i need to add a texture or render effect on the walls to get rid of the smooth finish of the foam board. I do this by mixing a fine sand (pinched from the play ground around the corner) with a paint thickening medium i found in my art box. You could do the same with sand and PVA glue mixed up. I then paint a liberal layer of the stuff onto all the exposed walls, making sure to stay away from the exposed brickwork and the window frames, and let it dry. This makes an excellent texture to paint on the outside of the houses.

To add a bit more character i needed to make more rubble and debris for around the place. The rubble i made with more modelling clay by rolling out a large flat piece to about 1-2mm thick and when it was half dry cut it into small cubes. I made a big pile of bricks and rubble this way. I also chopped up bits of balsa wood into broken beams and bits of roof. This extra debris was then glued on top of the original piles, and new small piles were also added just using the new rubble.

The whole building was then painted with black acrylic. Be careful not to use a cheap spray paint on foamboard as it can dissolve the inner foam part, and therefore would destroy all your hard work carving the brickwork. Last but not least i made a framework for the roof sections out of balsa wood and roof tiles out of more modelling clay. The damaged removable first floor sections were also made with balsa wood. I just drew floorboards onto the balsa wood using a biro which creates a decent paintable effect. So now all the bits are made all that is if left is to paint and construct. We will see the end result in Part 3!

20160430_074755


Ruined Buildings Part 1

I wanted to make some more ruined and battle damaged buildings for my table top, and thought i would document the process with the help of Colonel Mustard.

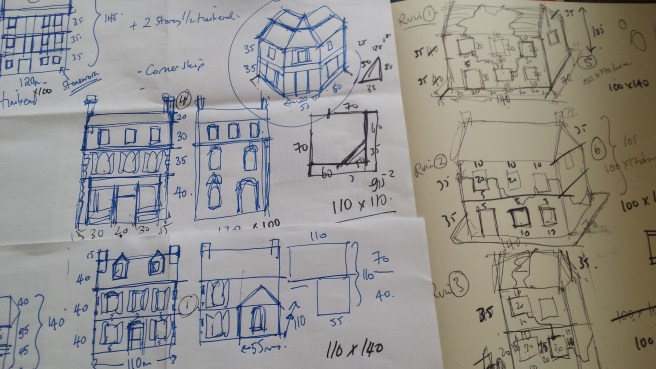
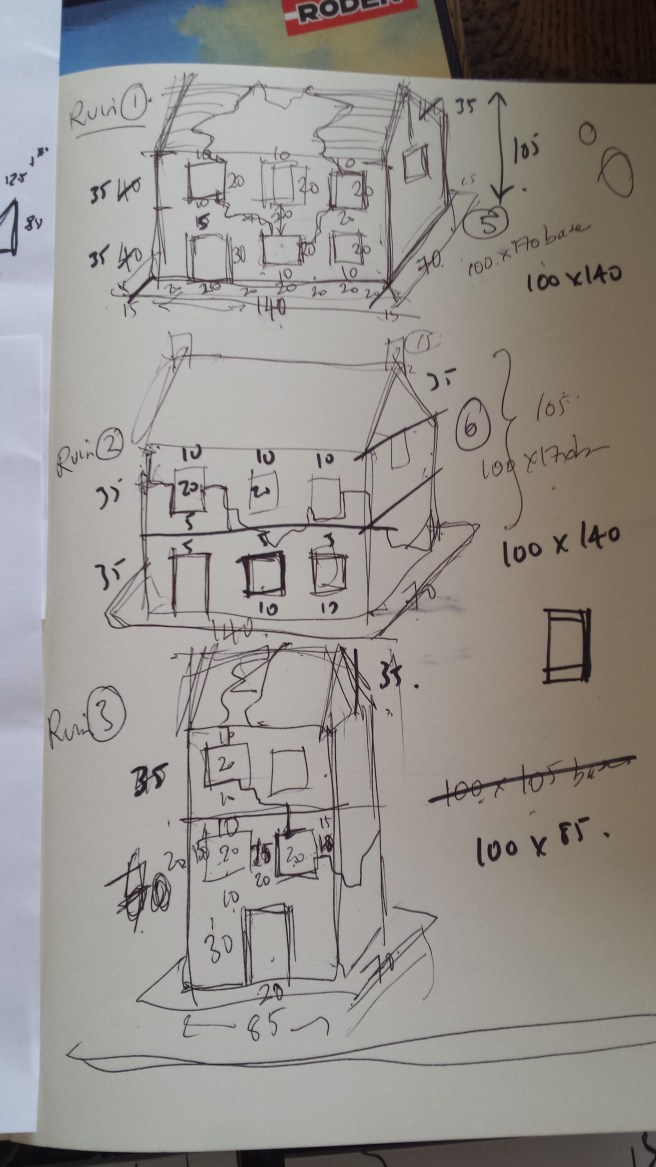
First up i drew up some rough plans and designs. There are plenty of places to get inspiration, the internet being the most obvious. I settled on making a house that has its centre completely blown out and a half flattened, heavily damaged cottage. I use 40mm per storey as my basic measurement (although in my drawings i did change to 35mm but then changed my mind back). Doors are 15mm x 30mm tall and windows 20mm square. I sketch out the basic plan and measurements as you can see below.

20160422_12370720160422_123841

For the base i use a 15mm border around the bottom of the building. In this case i only put a border around the front and back as i wanted to be able to place the ruins adjacent to each other with no gap to form a ruined terrace. My next step is to cut bases out of 3mm MDF, making sure you calculate the correct width and length of your building plus any border required. I then draw my building design onto 5mm foamboard. Most houses end up as four pieces as they are no more complicated than a box. I guess this is why i object to paying through the nose for purchased buildings as they are little more than an MDF or plastic or resin box that is decorated! I can do that for less than $30 per house.

Once you have accurately drawn your building cut it out carefully using a sharp knife. Try and keep the knife perpendicular so you cut straight through the foam and don’t leave any wonky angles. Cut out all the window and door frames too.

20160422_123751

I then cut away some of the card covering on the foamboard where the building render has been damaged. You can draw guidelines around some of the damaged walls and then cut through the card outer layer. Slide your knife under the card layer and peel if off carefully. Then with a ballpoint pen draw on exposed brickwork. When you press on the foam core it creates a texture which looks really good. Then its glue your box together on the base  with PVA glue and leave to dry.

Then its a question of cutting out 20mm x 5mm sections of balsa wood and gluing them into the windows as frames. i also add 20mm x 5mm balsa wood as window mantels and lintels. Above the doors i also put a 15mm x 5mm lintel. On the inside walls i add balsa wood beams halfway up the building, which indicate where the floor would have been, or if you do put some floor in they can act as supports.

At this stage our ruins look like this. In my next post we will do the building texture, rubble and debris, the roof and finally painting!


Normandy Bocage Part 2

Following on from my blog a few weeks ago i recently finished more bocage sections using the same techniques as before. MDF bases with coconut fibre foliage flocked heavily with a bright green. Some sections include trees sticking out, which is apparently how these hedges evolved. Some sources put bocage up to 5m in height so with a scale of 10mm to 1m I made these sections up to 50mm tall. They definitely look the part and will block line of sight nicely and make my Normandy battlefields look more and more realistic.

I laid them all out with a home made ruined building and a few German armoured vehicles cruising through. Check out my photos below!

Normandy Bocage with Coir Coconut Fibre

After further internet research i made some new bits of terrain for my Normandy battlefields. Passing through my local Bunnings Warehouse i stumbled upon a big bag of coir coconut fibre for about $6.00. Having read a few blogs about making bocage out of this stuff i thought i would give it a go! Normally this fibre is used for lining hanging baskets and gardening things like that, but for me it was going to become a 5 metre wild hedge on top of a bank/ditch. I think i read an excellent blog called “Little Tin Men” where the idea was illustrated so well.

I cut strips of 3mm MDF 40mm x 150mm and then glued strips of old cut up expanded rubber camping mats (about 6mm thick mats) and glued them on top of the MDF. When they were dry i would carve the sides to be sloping to represent the banks of the bocage. You could use any kind of foam or polystyrene for this too. I then coated each one in acrylic gap filler to smooth out the whole thing. When that was dry a liberal coating of PVA glue followed, which was covered in fine dirt/sand/gravel from my front yard. Regular sand would do the same job. Small twigs and sticks were then jabbed into the foam to give the hedge some structure. I put about 4 twigs into each section. You can also use bigger twigs that turn into trees sticking out of the hedge.

It was then a question of dipping sections of coir fibre into PVA glue and adding them onto the bocage sections building it up to 30-40mm high. This gets messy! Do not worry about being neat and tidy just get the fibre onto the base! I am going to try a hot glue gun next time as i have read good things about this gluing weapon. Once the PVA and coir is dry i attacked the hedges with a pair of scissors to tidy them up. Next a full spray of cheap dark brown paint covered the whole construction.

For the foliage I used a nice coarse bright green flock, but you can use whatever you have kicking around. I think multiple greens work nicely. Paint or spray on diluted PVA glue (50/50) to the hedges and then sprinkle on your flock. Don’t be stingy just chuck it all over the place. Shake off the excess and leave to dry. I did this process twice with different types of flock. Finally i mixed up a 50/50 PVA/Water mix in a spray bottle and sprayed the whole construction again for extra durability.

Final touches were to paint the base an earthy brown and then dry brush lighter brown to pick out the texture and light grey to pick out any bigger rocks. The base was then also flocked with a grassy green to finish it off! The same process i used for some trees on a base, which you can also see below.  I reckon this is the cheapest and most effective way of making big sections of bocage for all your Normandy battle fields out there!

IBG Models 1/72 Chevrolet C15A No.11 Cab Personnel Lorry

IBG Models are a Polish model company that make a smallish range of 1/72 scale vehicles mainly for the Allies. Some British and American trucks and carriers. You can buy them direct from the company in Poland, which is probably the cheapest option, or if you are like me you can get them at around AUD $20 per kit from good Australian stores like BNA Model World.

What can i say, you pay a bit more for these kits, but they are worth it. This Chevy truck was a pleasure to build. There isn’t much more for me to say! IBG make three or four versions of the same truck, plus some British Bedfords and Universal carriers. They have some good looking American trucks too which i am definitely going to try. For your Allied army transport needs do not look any further than this!

In the back of mine i put some crates and stuff and a few British Tank Riders from HaT. Same with the driver who is a cut down HaT figure. When i get some more of these i will try putting some relaxed Tommies from AB Figures who have just the right poses lounging around in the back….

The paint job was a simple olive drab and some dirt. Good decals are supplied. No arguments here this was a great model to build and i would recommend it to everyone!