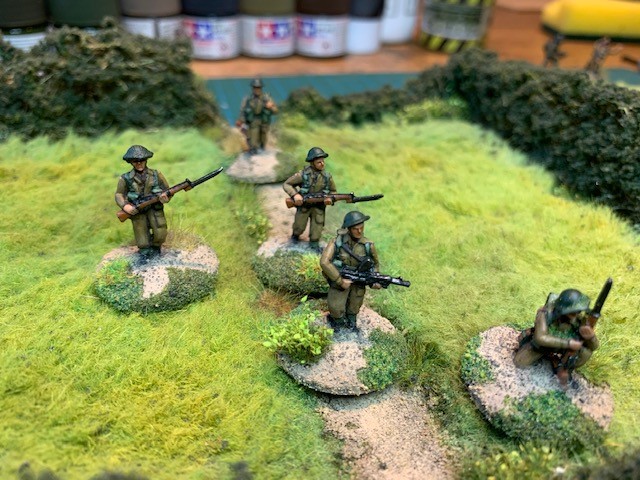
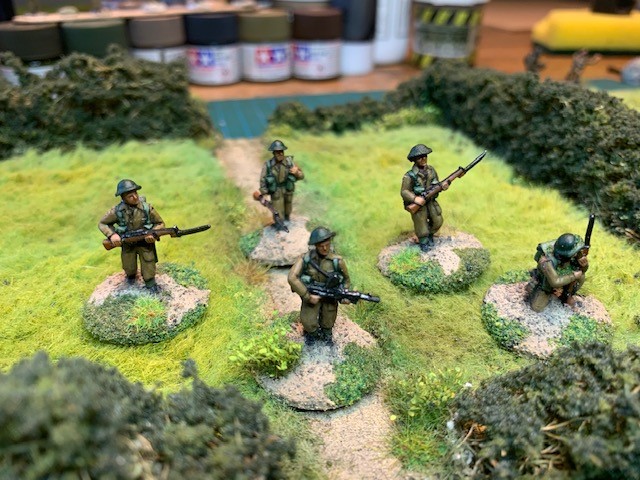
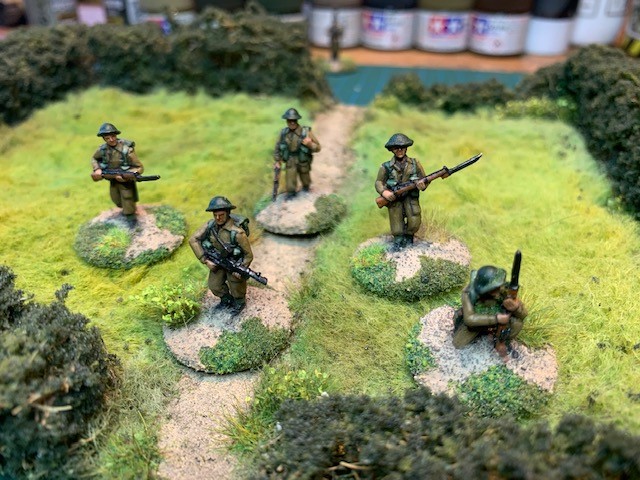
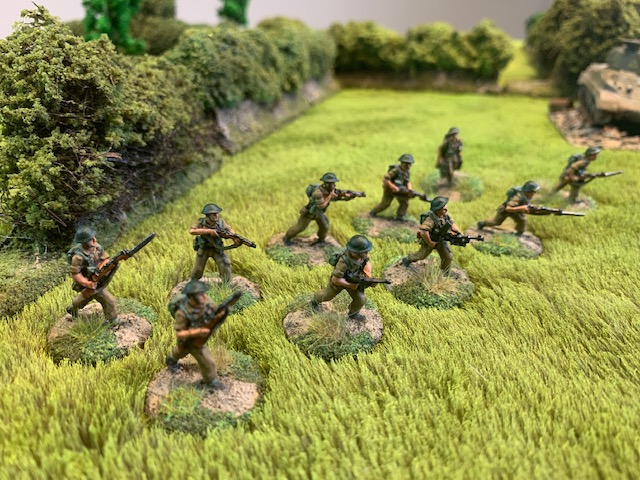
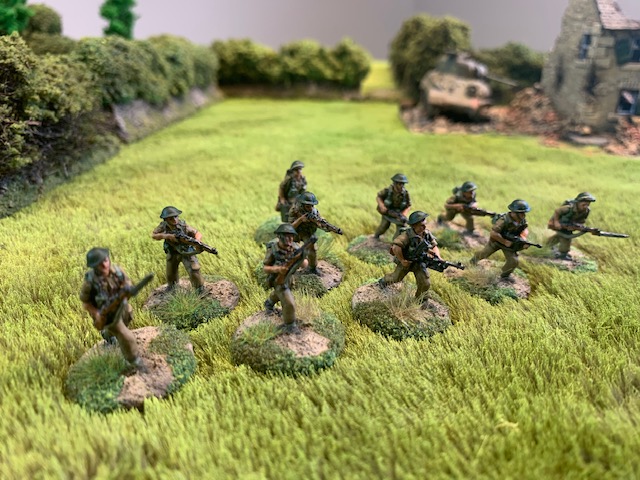
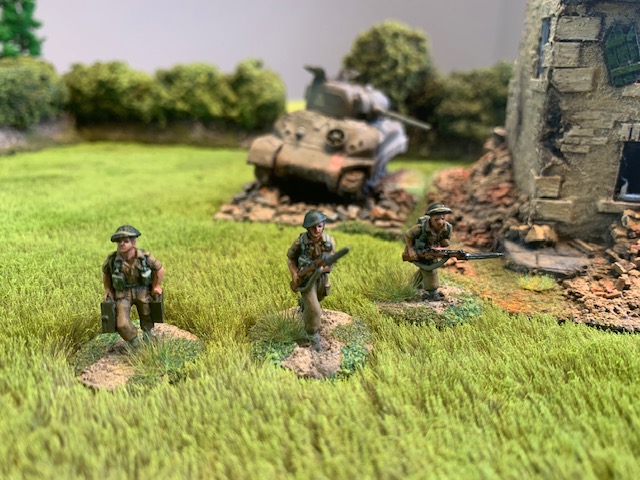
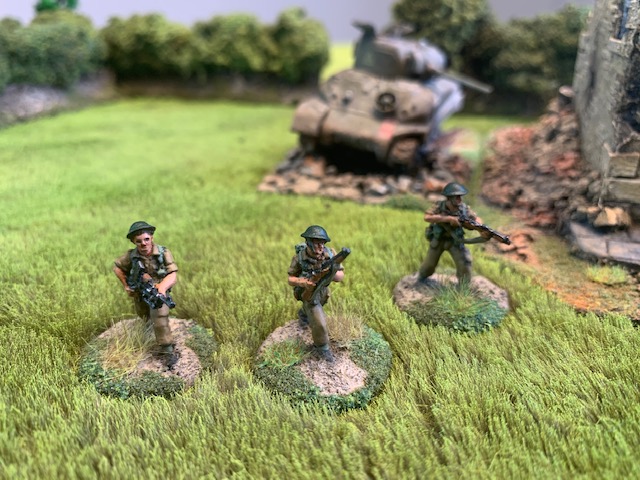
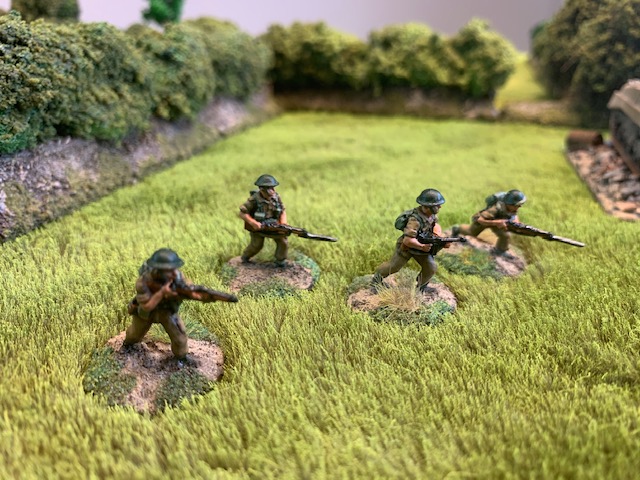
I keep on buying more British infantry for my forces. I do not really need to, but when has that been a logical reason to stop buying cool figures. CP Models produce a huge range of figures, and their World War Two ranges are my second favourite behind AB Figures. Great details and easy to paint. They pretty much paint themselves. These guys are a five man squad of British tommies and a four man vehicle crew. I used my usual colours for British Army and tank crew. I do not like the slot plastic bases provided so I snip off most of the metal and glue them into modelling clay on a 10 cent piece. So here is another squad wandering through a quiet paddock and an armoured car crew stretching their legs. I think a Daimler crew is actually only three men, but let’s not make a big deal out of that……
Another great British Armoured Car I picked up from the best place for Hasegawa kits – my friends in Japan https://www.1999.co.jp/eng/plamo/
From Australia these Hasegawa kits only cost 810 yen which i think is about 7-8 USD, and postage for three kits is about the same. So a pretty good deal and way better value than buying these kits from any other retailer. I really liked the Humber Armoured Car kit they make, and needed a couple of Daimlers for sure. This kit is in the usual grey plastic which is really easy to work with. Not too many pieces either which always makes these Hasegawa kits perfect for an evening of easy model making. Most importantly for me is that everything fits together and instructions are clear and easy to follow. Plenty of good detail in this scale and easily enough for my purpose of putting them on my table top.
My Daimler had a couple of additions, including an aerial, a pickaxe on the front and a hatchet on the back. Also some stowage items added on the back and sides. He received an olive drab paint job as usual, but I don’t think I bothered with a brown wash this time. I do a gloss varnish coat where I am placing my decals and also use a decal softener which does help with blending the decals into the paint work. As with all my wheeled vehicles I like to base them on MDF bases to prevent any damage. Some European earth weathering powder makes Mr Daimler look well used. I still do not bother with any chipping or other effects on green vehicles as i am not sure it really adds much. I really enjoyed making this kit and next up have a Staghound Armoured Car from a company called RPM which is new to me. Hopefully it’s just as good!
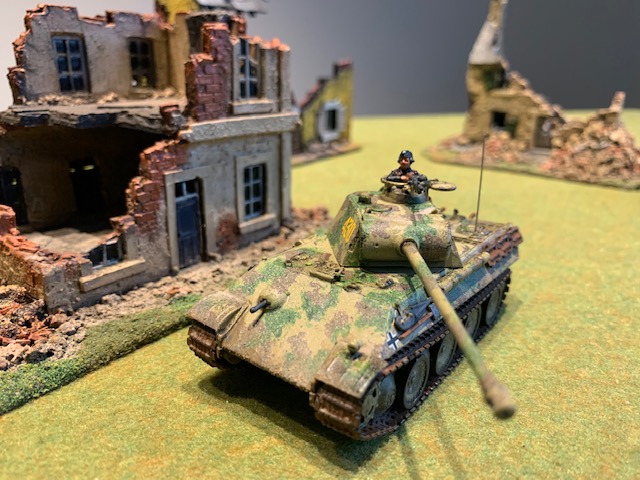
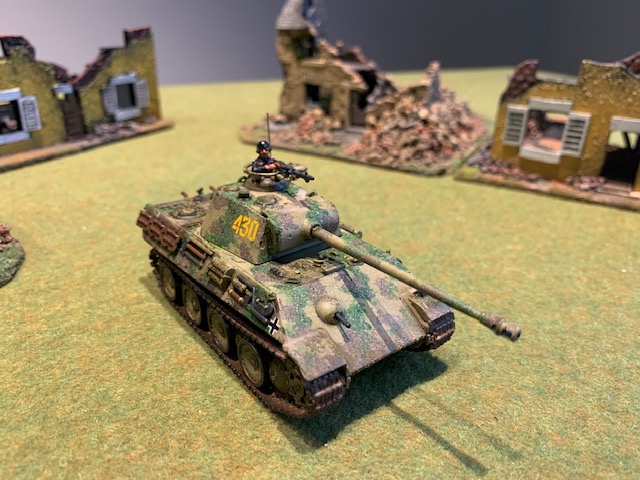
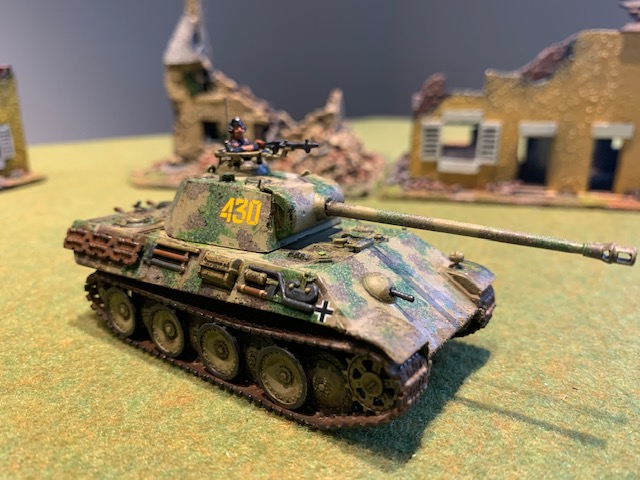
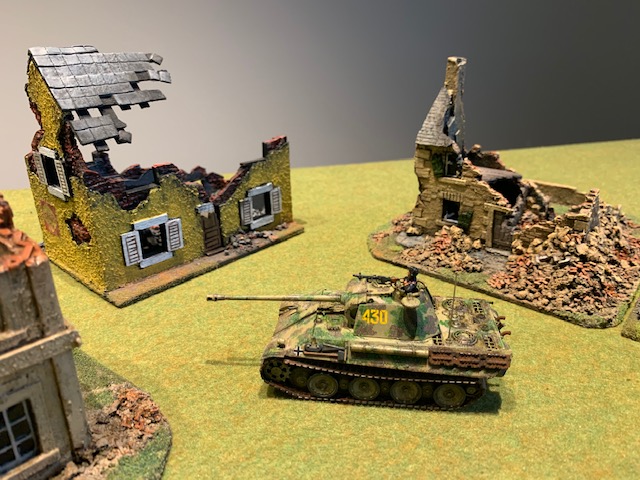
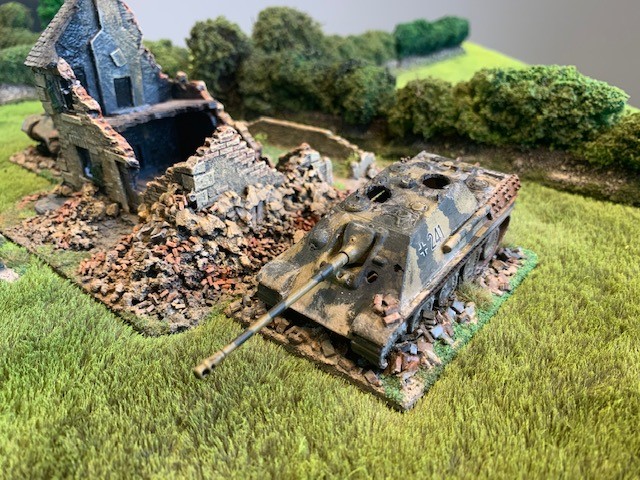
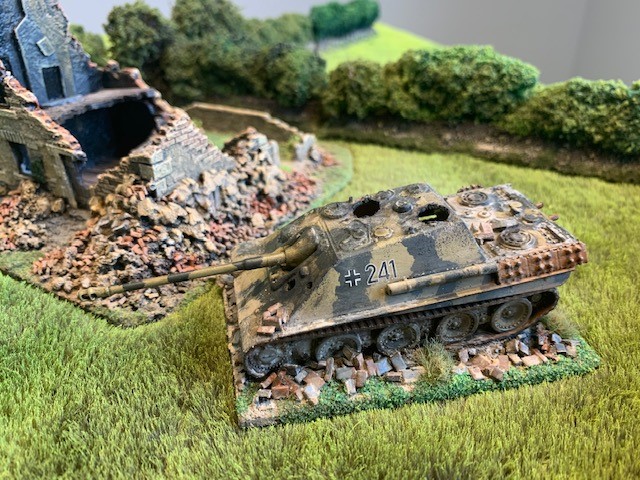
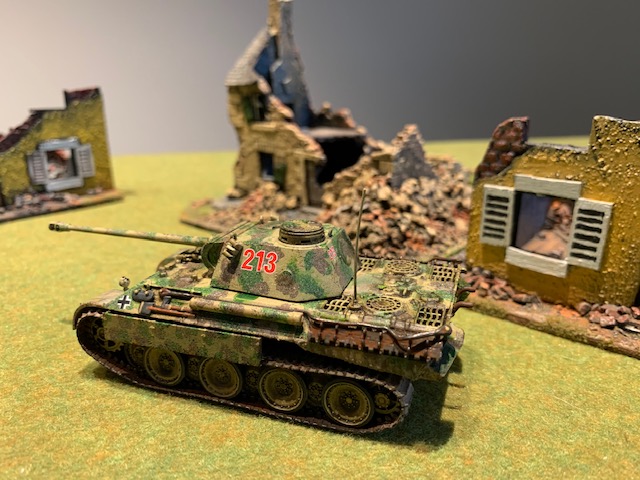
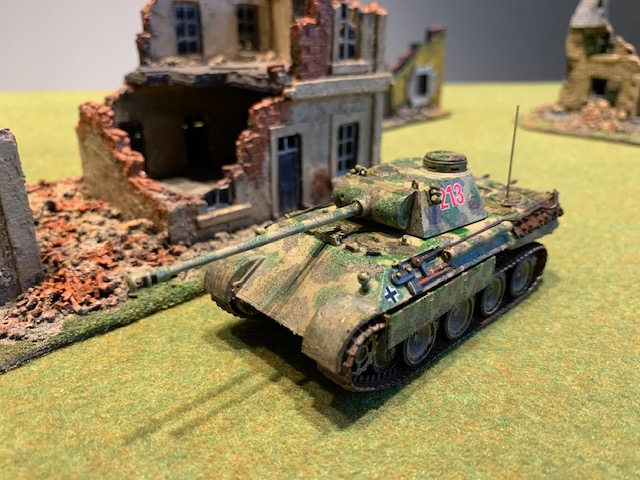
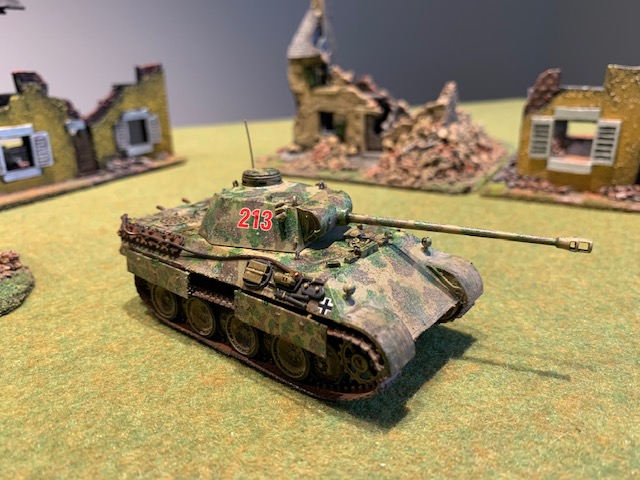
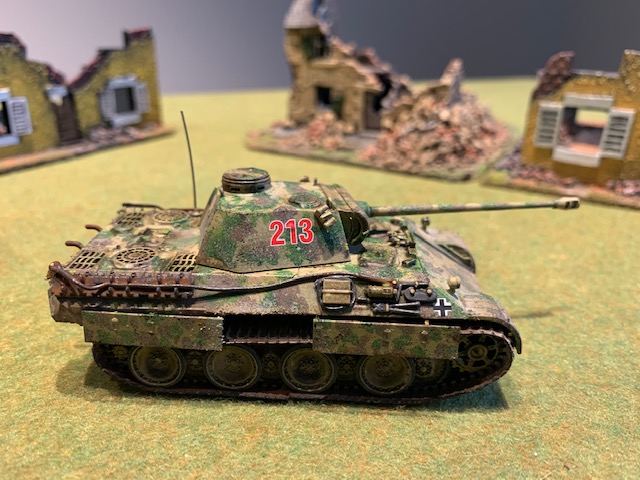
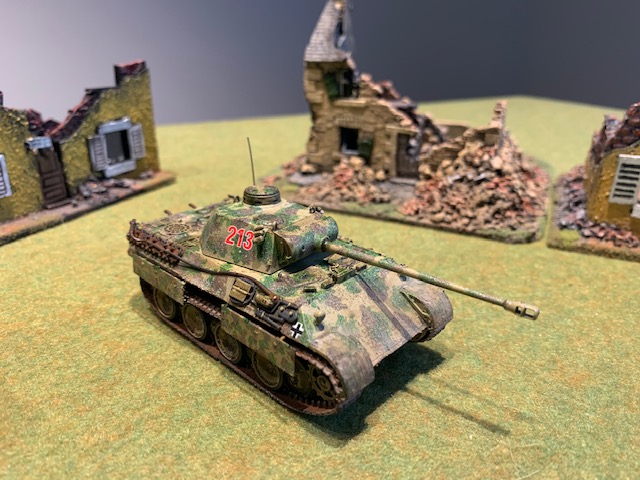
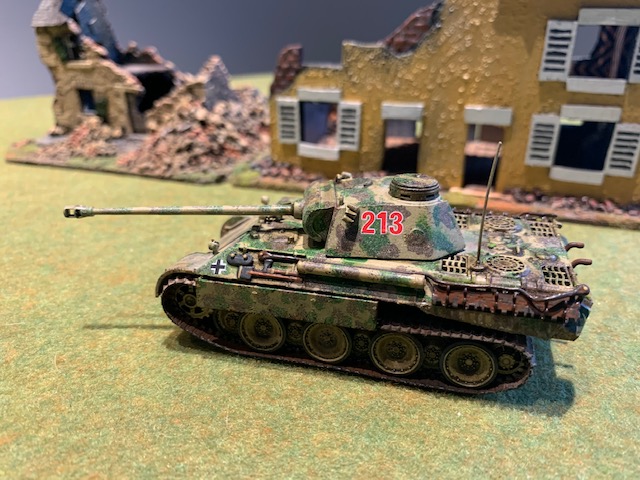
I picked up another bargain Panther kit on eBay, I think this one came from France for a few Euros. Not that I needed another Panther, it is just hard for me to resist a bargain. Especially a big cat bargain. So now I have nine completed Panthers (4 Plastic Soldier Company, 2 Zvezda, 1 Esci, 1 Dragon, 1 Revell). Which is more than enough for any battle. Although I have almost finished a Hasagewa Panther too – so that will make ten. So no more Panthers. At least I can say I have a good grasp of Panther tank kits in 1/72 scale.
Revell always make good kits. This one is also good, except for the weird looking turret. The size and shape of the turret is a bit too tall compared to other kits. Not that it is very noticeable. The hatches can be left open which is nice for those of us who will place a commander in the hatch. I added an aerial and left off the schurtzen. The tracks are great link and length and not crappy vinyl. The decals are excellent and they give you enough for a couple of vehicles, so I used the others on my previous Zvezda Panther. The tank commander is an AB figure as usual as they are the best!
Really enjoyed building this kit, and its only the slightly weird turret that is a negative. If you can find a good deal on eBay it is well worth it. One day I will line up all the Panthers together so we compare and contrast.
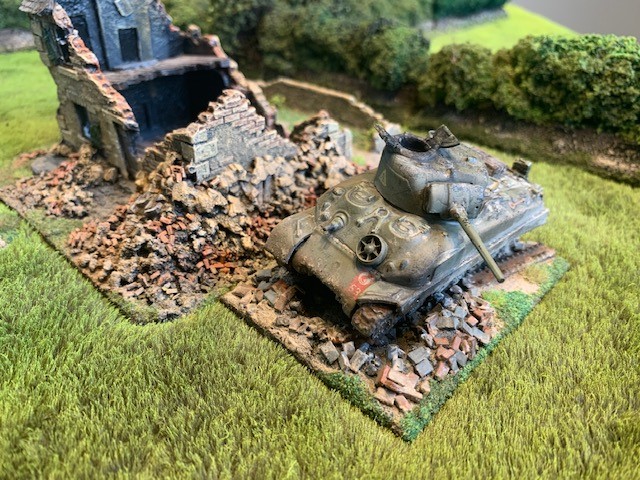
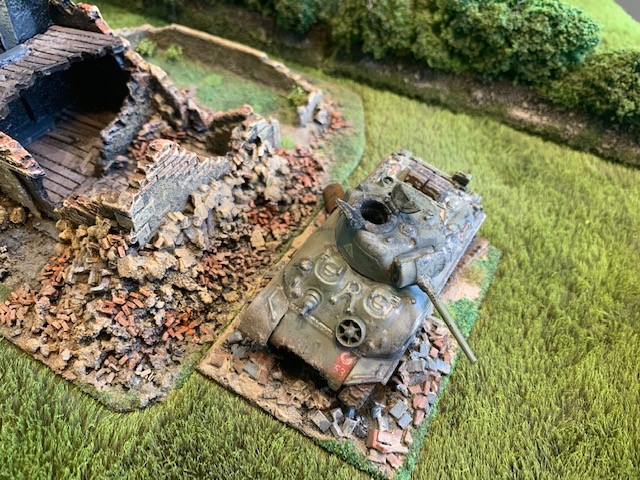
I wanted to create some wrecked vehicle markers, both as nice looking scenery and bits of cover, as well as potentially actual wrecked tanks to replace vehicles destroyed during proceedings. I thought that having a few actual wrecked models would add to the variety rather than the usual plumes of cotton wool smoke.
These two are a Plastic Soldier Soldier Company Sherman and an Armourfast Jagdpanther. Neither model I was particularly impressed with. The Sherman was very big and chunky and I found many better offerings from Trumpeter, Esci, Dragon etc. Same for the Jagdpanther who was since replaced with much finer model kits from Zvezda and Trumpeter again. SO i got to it ripping off bits, hatches, tracks and punching holes in the hulls with pins and drills. I placed them on bases at funny angles which helps with the drunken wrecked look. I added lots of homemade rubble and stuff and other bits and pieces of debris. Always good to have an old oil drum kicking around. I used a heavy brown wash followed by lots of dust and dirt powders and some charcoal to show the burnt out bits. They look good just as extra scenery cover near some blown out buildings. I am looking forward to Christmas and hope to get some more work finished so I can post more pictures!
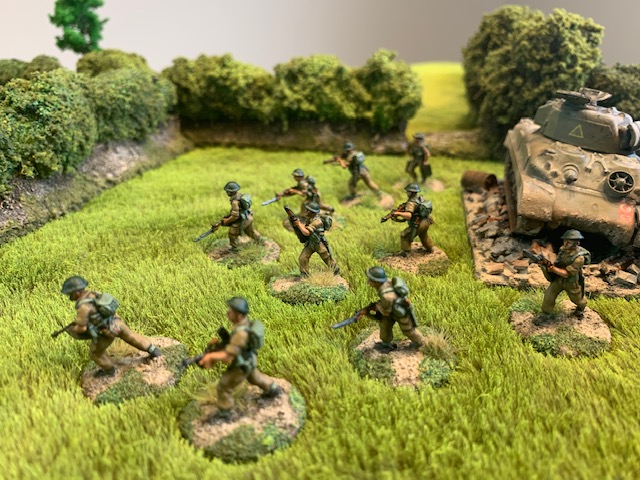
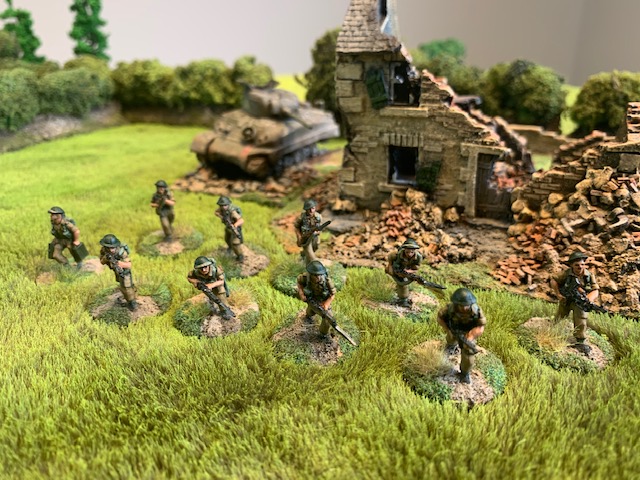
I am so close to finishing up my British Infantry battalion it is not funny. The trouble is i keep finding more awesome figures to buy and paint. This platoon from my favourite AB figures was no exception. I think they are meant for the Far East by the equipment and the presence of a Thompson sub machine gun, but I have painted them up to join my Northumbrian Light Infantry in Normandy. Nothing much to add, they took me ages to paint as usual.
I was asked about the new grassy mat I have photographed them on. This was made using a faux fur blanket I found at Spotlight (an Australian craft store). The material is available at this link – i have no idea if the same stuff is available in other countries:
The trick is that this particular fabric has a fur length exactly the height of grass at 1/72 scale so you do not have to cut it or shave it or mess with it at all. You could easily shave roads and paths into it if you like, but i tend to place all my terrain on top, or hills can be anything placed underneath. Other fur fabrics are a pain as they are generally quite long and need a lot of cutting to get them to look like anything else except fake fur…..
Painting is simple. I just laid my 3m x 150cm fabric out on the lawn and sprayed it lightly with a lime green and bright yellow cheap spray like the below. $3.50 per can, and i probably used 2 green and one yellow. You could throw in some brown or beige or cream depending on the effect you want.
The trick is to take it slowly and spray lightly and repeatedly so you retain the texture of the fabric and do not get it swamped or claggy. When you are happy with the colour mix leave it to dry. If you get spray paint on the lawn dont worry it will go away next time you mow.
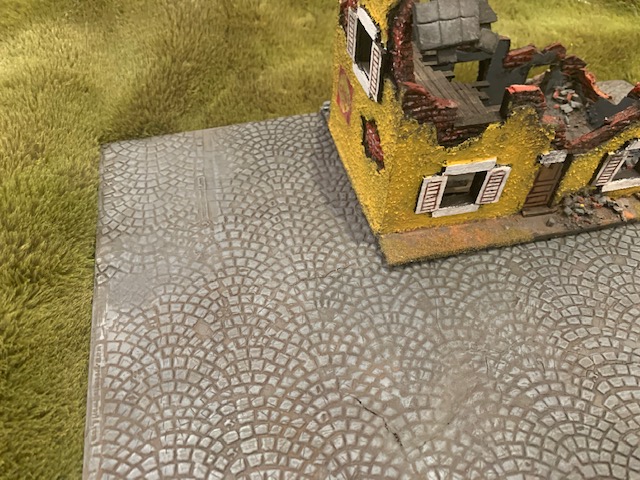
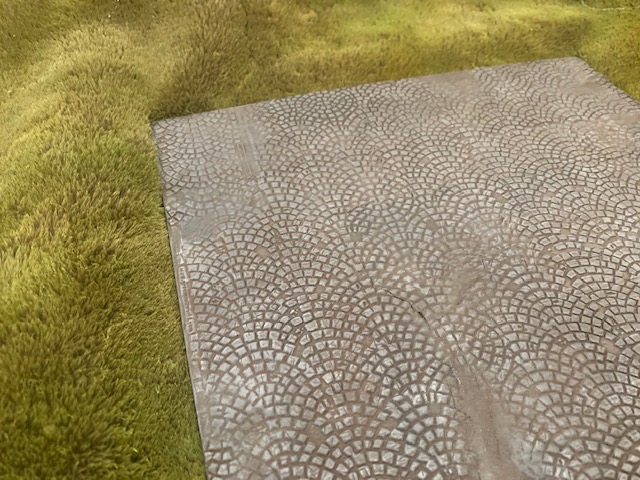
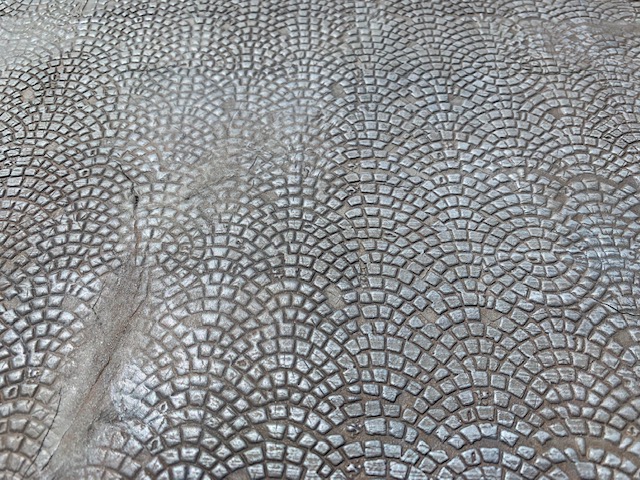
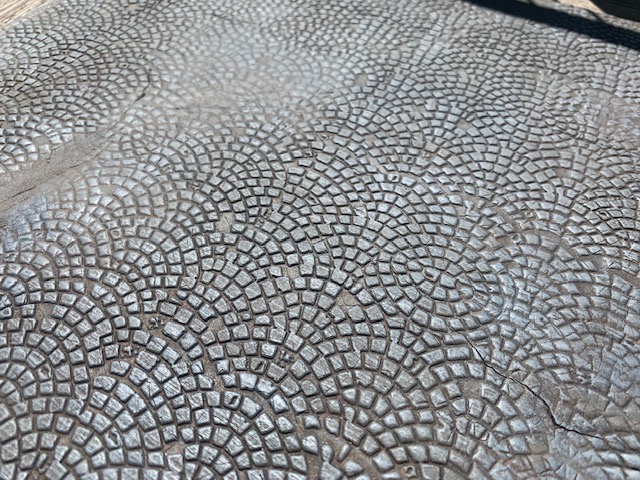
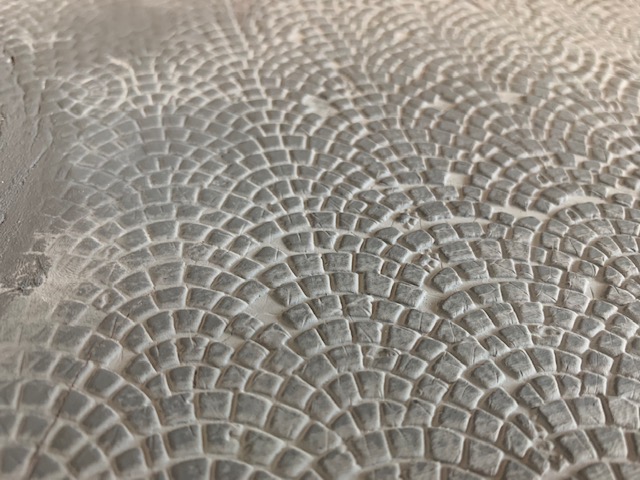
I have been struggling to make roads and town squares for a while using various different methods. Hand scribing cobble stones onto a thin layer of plaster on MDF looks great, but it is wildly time consuming. Textured card glued to MDF or wood also works, but looks a bit flat and a bit fake for my liking. The best method I have now settled on is a textured rolling pin from a company called Greenstuff World at www.greenstuffworld.com
They produce a big range of interesting things for the modeler. I picked up some of their textured rolling pins. I found the 28mm scale one of cobblestones which is about 25cm long works really well for 1/72 scale cobbled town squares and roads. The detail stands out better than the smaller roller means for 15mm scale. I decided that I wanted to just make larger cobbled squares and put them together to make a large town area. Then the buildings would stand on top of the town area and the cobbled roads would be formed in between the buildings. Using MDF i cut a roughly 25 x 25cm square and then rolled out DAS clay nice and thin to the same size with a bit of an overlap. You then carefully and firmly roll the textured rolling pin over the clay in one direction making an imprint. I left this to dry, glued it to the MDF and then trimmed the edges.
I gave it a base in a grey spray primer and then used some brown and black washes and a whole heap of dry brushing lighter shades of grey. Check them out. When I have made a few I will set up a town scene to show the effect.
I still needed a couple more panthers to get up to three troops of three tanks, so I picked up a Zvezda Panther on eBay. I have made one of these before and also a few of the Panzer IVs and also a Tiger so I know what I am in for. These kits are advertised as snap together which really only means some of it is snap together, but if you are like me you are going to be gluing it all together anyway. Zvezda kits are generally really good. The detail is excellent and parts go together very nicely. Also they are great value for money, especially if you buy them from Eastern Europe where they are made. I don’t think this cost me much more than $10–12AUD.
My only criticisms would be as follows. The hatches are all moulded shut, so if you like placing extra figures in the tank, like I do, you cannot, unless you are brave and feel like doing some surgery.
Due to the snap fit design some bits are tricky to get together, like the rear of the top hull fitting into the bottom. I had to cut off a couple of small lugs that were just bending rather than fitting. Also there was a gap at the front where the hulls meet and i had to do some filling and sanding with my magic putty.
The track design is great, you wrap around the flexible tracks and then fit them onto pegs in between the wheels. This can also get tricky as its a tight fit, and you need to be very careful not to apply too much force and break any of the sprocket wheels. I made this mistake before on the Tiger so I was extra cautious this time.
My paint job was a patchy camouflage scheme and some dark washes, plus plenty of dirt and dust to finish him off. I added an aerial and half destroyed the side skirts for some interest. I used some excellent decals from the Revell panther i finished next which gave more options than this kit.
Another venerable kit from Airfix that I found on eBay for pennies. It is worth it just for the nostalgia and you can never have enough trucks for your troops!
It is still a nice easy kit to build. I did not bother building the gun that comes with the truck and I had to replace awful driver with a better one. I also tried to add windows and a windshield to the cab with varying degrees of success.
The only other issue I came up with was adding decals to the uneven side panels. I think I need to investigate decal softener and see if that helps this kind of situation.
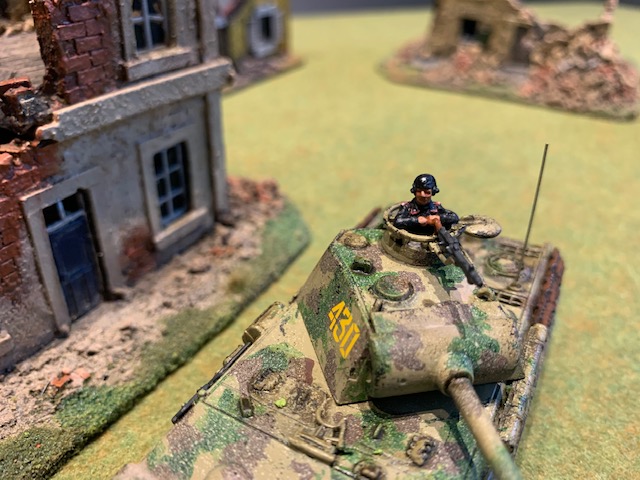
Another big German tank finished. This time a Panther. So far my Panther brigades are made up of Plastic Soldier Company vehicles and one from Zvezda. Dragon kits are always a special treat, they are great to put together. I always keep one eye on the Dragon USA web site as they often have special deals with kits going as cheap as USD 8-10. That is a great saving over anywhere else. It is very rare that Dragon kits come up on eBay for resale, and if they do they are quite often priced higher than buying from the source. So where is the value in that?
The moulding and detail on this kit is of the usual high standard I would expect from Dragon kits. The running gear is very clever as it is moulded in rows making sure each level of wheels is straight. It also saves on time but does not reduce the realism. The tracks are the nice soft type that fit very easily and can be glued to produce sag on the top of the wheels. Oh what a relief after fighting for days with a face full of superglue wrestling with those old Esci tracks! The detail is very delicate and a different level to the Plastic Soldier Company models. The only addition I made was the plastic aerial on the back. The side skirts are optional and are nice and thin. In hindsight I wish I had made some damage to one of them like on the box art. Next time.
My paint job started out well. A nice covering of sandy dunkelb, followed by camo green and red brown patches with my brush. Then I over sprayed with my Tamiya dark yellow to fade everything out. Unfortunately I am still experimenting with my weathering. So I think this time I overdid it with the chipping and lost some of the impact. As always its a learning experience, so next time I will take it easy with my sponge. I used decals supplied with the kit from the two options you get.
This is a great kit. Much better than some of Dragon’s other “fast build” type offerings I have built. I think to hide some of my average painting I will add some extra foliage branches and stuff like that. In case you are wondering I had to take photos on a bit of white paper as my table is all packed away for renovations. I think I need a stronger light source for my photos! Next I have a vintage Esci Panther, oh no back to the horrible tracks of death……….
Not anything new finished but just a shout out to the fantastic candy shop that is eBay. A nice lady in Canberra was selling off up to 300 model kits she said were gathering dust in her roof. I am not sure why so many, or maybe some of us just end up with a roof full of kits and don’t complete them in our life time. I can see that happening to be honest.
I picked up three vintage Esci kits for less than $10 each. In perfect condition even though they look like kits from the 1980s! They even have that musty old library book smell to them. I love the smell of old library books in the morning. The parts are all wrapped in plastic still, although the decals look as if they curled up and died a while back. So I added more German armour to my growing pile of kits!
My favourite thing was in the instructions, which really showed the age of these kits. To bend the towing cable to fit to your model the instructions instruct you to use a lit cigarette to heat and bend the plastic. You couldn’t do that these days. That was back when Steve McQueen smoked and it was cool. And it didn’t kill you. The good old days.
Anyway check out the illustration in the instructions. Brilliant. I am off to buy a pack of Benson and Hedges. Not sure they sell them in Australia. If they do Malcolm Turnbull is probably smoking one right now………